How to Schedule Post & Video to Instagram from PC
Previously, we’ve talked about how you can post to Instagram using PC. However, when it comes to scheduling Instagram posts, you still need an alternative outside of Instagram web or mobile app.
So, where to find that hassle-free, secure tool with enough analytics for users to trace their progress whenever they need to?
The solution is: Creator Studio.
Table of Contents
Why Creator Studio?
I’m going to be honest with you – it’s free. Also, it’s owned by the company that owns Instagram.
Although many methods were introduced before this, such as installing additional browser add-ons, extensions or tools that claimed to work, but some of them aren’t as effective or may not be completely safe.
There are also paid services/plans that allow posting and scheduling with detailed analytics. That’s great, but personally, I only use web/desktop Instagram on rare occasions. So, a paid service won’t be necessary for me at the moment.
Creator Studio is not perfect. Although having the same regular posting feature, it still unable to post Story to Instagram. Even so, having a post-scheduling feature definitely makes it stands out and worth a try.
But, in order to make full use of Creator Studio, first, you need to link it to your Instagram Business account.
Two Ways to Link/Connect Your Instagram Business Account to Creator Studio
In order to connect to Creator Studio, make sure you have an Instagram Professional account (Business or Creator) ready. If you don’t, you may follow the instructions here on how to convert from your Instagram profile.
At the same time, take note that you can connect to Creator Studio with two options:
Method 1: Connect WITHOUT a Facebook Page
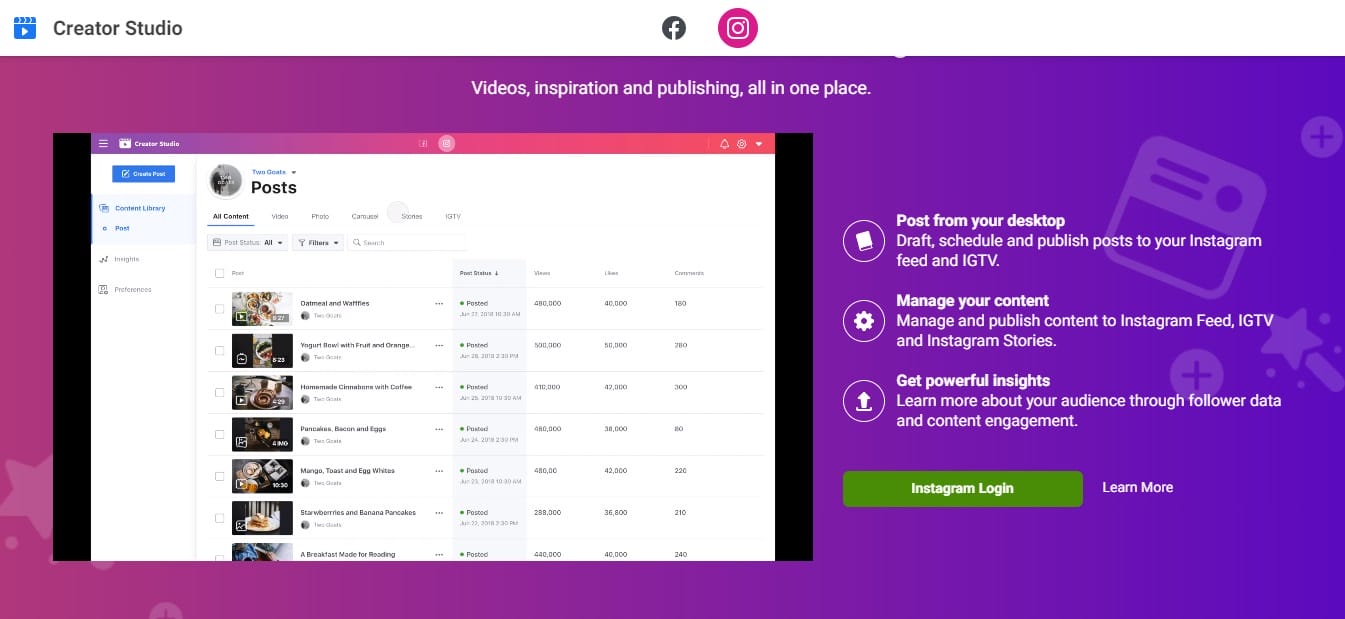
If you just wish to use the Creator Studio without owning a Facebook Page, simply click at ‘Instagram Login’ and key in your Instagram login details. You will be directed to the Creator Studio interface. You can start drafting and scheduling your posts from there.
Possible Technical Issue #1: Language Setting
It is possible that you may encounter technical issues or limitations during the process. For instance, language setting is unavailable in Creator Studio. This will be a problem if you’re setting up Creator Studio in a foreign country. What language you use will base on your currently location. By having a Facebook Page (which is administered through your Facebook Profile), this won’t be an issue as Profiles can usually determine the preferred language beforehand, hence Creator Studio will follow.
Sure, you can also use a translation tool for your browser but it won’t be as effective.
Possible Technical Issue #2: The Auto-created Blank Page
This blank page is difficult to remove if you decided later to connect to another Facebook Page instead. These issues were based on my personal experience and while the errors (hopefully) may not persist overtime, but unless you’re very sure, to save yourself from major headaches, I would recommend to do it with Method 2, since there’s a high chance you might want to manage it alongside with a Facebook Page.
If you’re worried about cross-posting between two platforms, there are settings you can tweak before this feature can work.
Method 2 (Recommended): Connect WITH a Facebook Page
The only difference from Method 1, is the accessibility of both platforms and cross-posting between the two. Unless you’re very sure you’ll never link it to a Facebook Page in your future endeavours, otherwise, Method 2 is a much recommended method: you can unlink the two platforms conveniently and avoid the technical issues mentioned earlier.
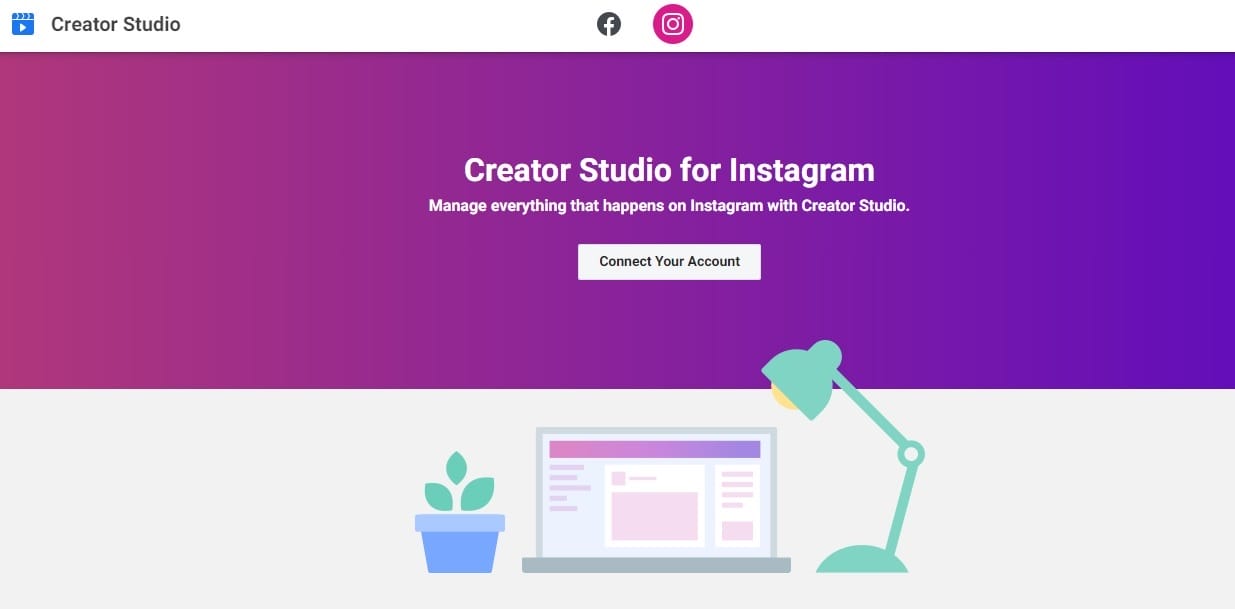
1. Go to Creator Studio and click at the Instagram Icon. Next, click at ‘Connect Your Account’ after you already logged in to Facebook.
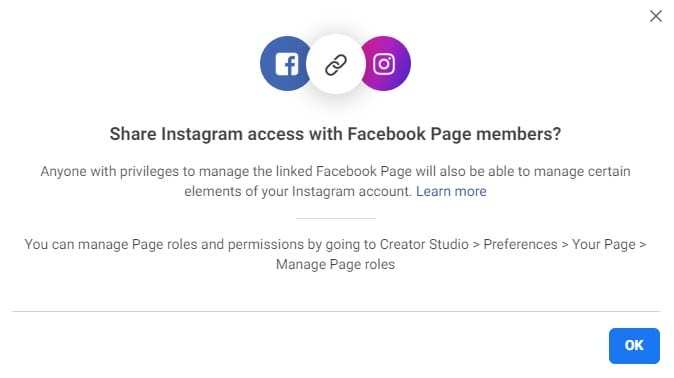
Note: You will be alerted on how your other Facebook Page admins may access Instagram. You can tweak or manage these permissions later. Click ‘OK’ to continue.
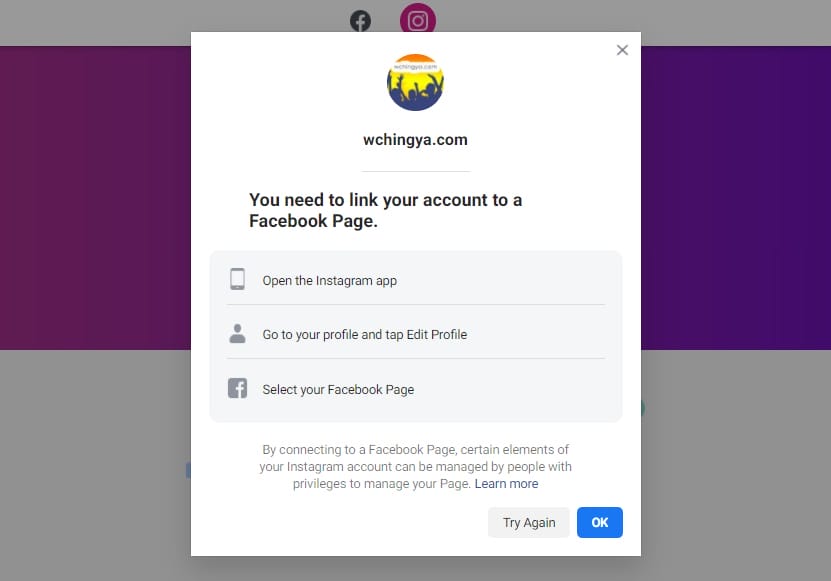
2. If you have already converted your Instagram Profile to a Business/Creator account, you will be asked to connect your Facebook Page to your Instagram account.
STEP 1: How to Connect Instagram Account to Your Facebook Page (From Facebook)
Although there are a number of ways to do this, my preference is to link from my Facebook Page. This way, I can ensure the right Page been connected to the designated Instagram account. Also, this will avoid Facebook from creating a blank page during the linking process.
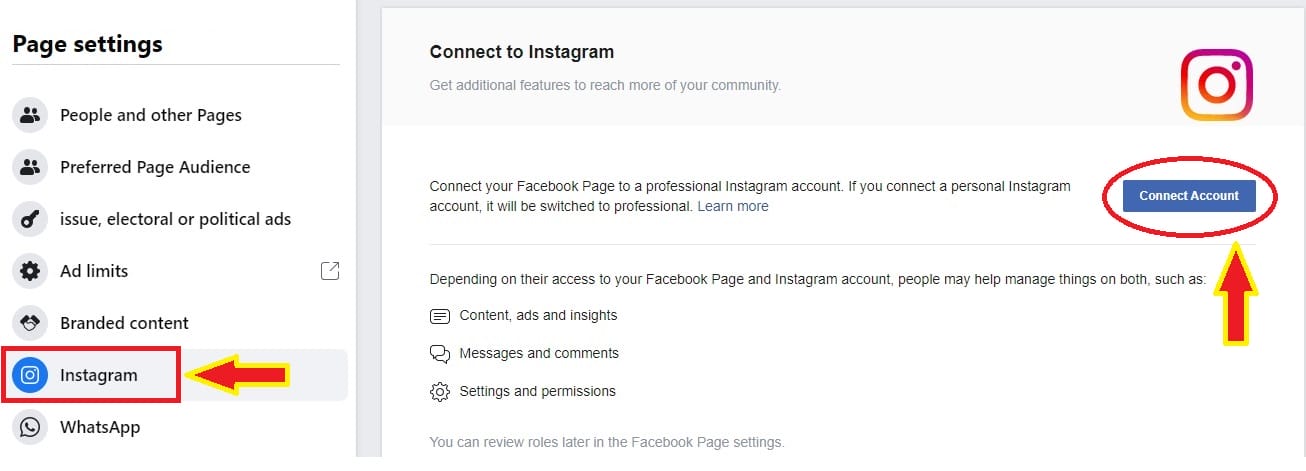
1. Go to your Facebook Page, look for Settings > Instagram > Connect Account.
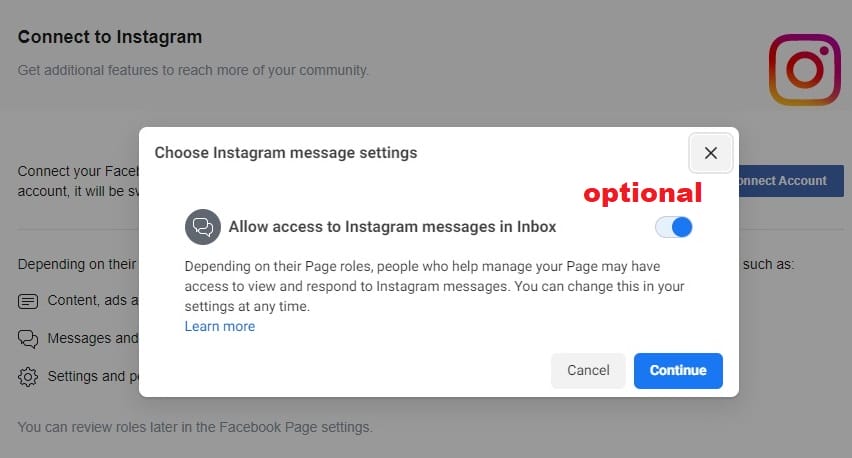
2. Set to allow/disallow access to Instagram messages in inbox, click ‘Continue’.
3. Proceed to login with your Instagram account details. Both of your Instagram account and Facebook Page should be linked successfully.
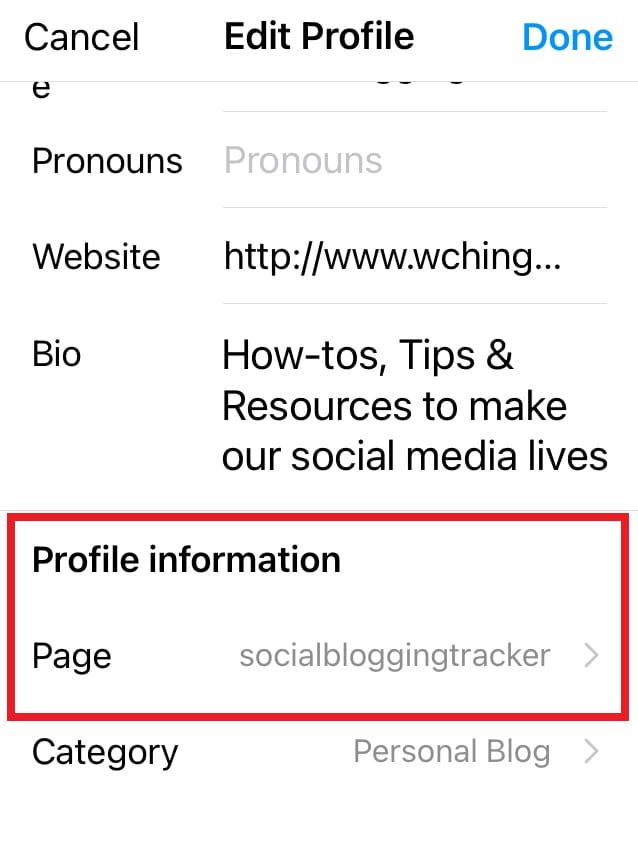
To check if the connection is successful from your Instagram account, go to Edit Profile > Page information > Page. Here you will be able to see your Page.
Once both platforms are connected, access the dashboard in Creator Studio.
Extra: To Disconnect Instagram from your Facebook Page, simply click ‘Disconnect’.
Optional: How to Connect Instagram Account to Your Facebook Page (From Instagram)
Here’s how you can connect Facebook Page from Instagram mobile app:
1. Choose either Option 1 or 2:
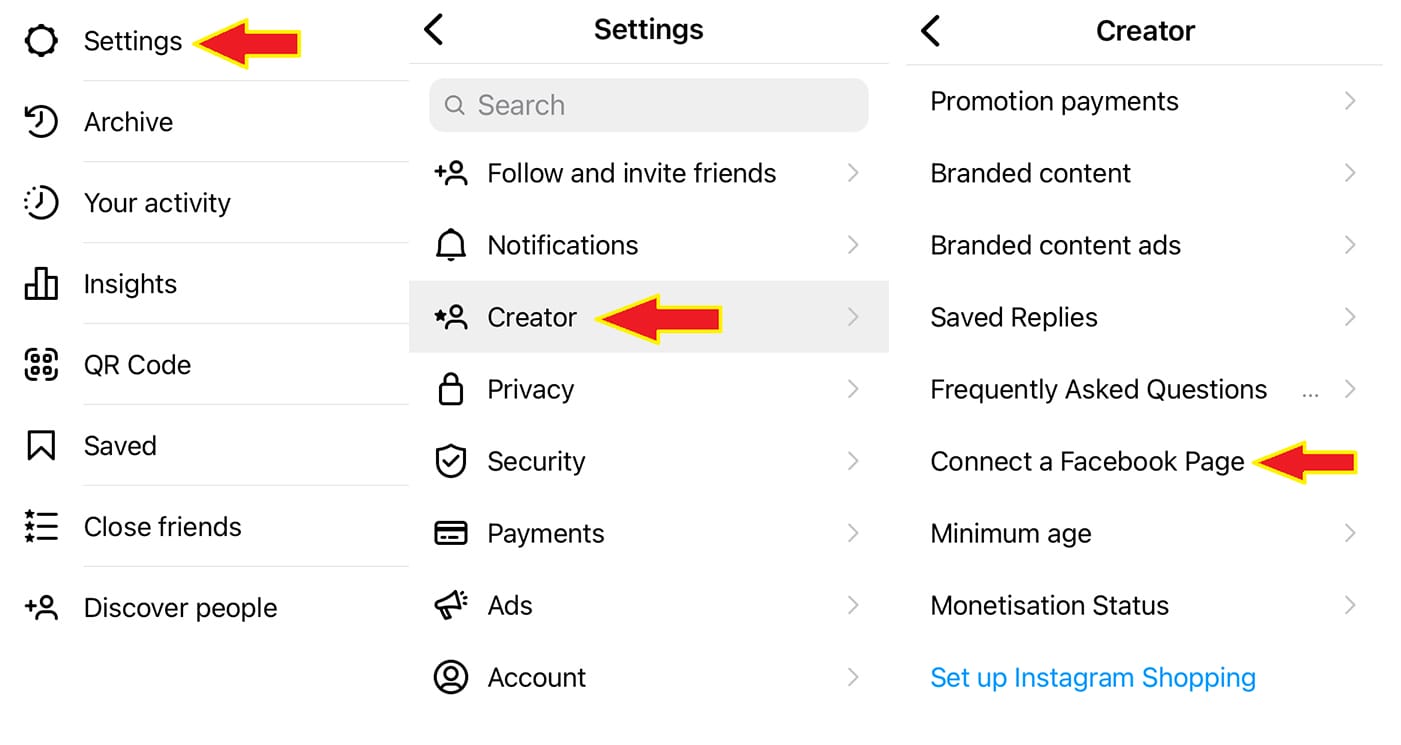
(Option 1): In your Instagram app, go to Settings > Creator/Business > Connect a Facebook Page
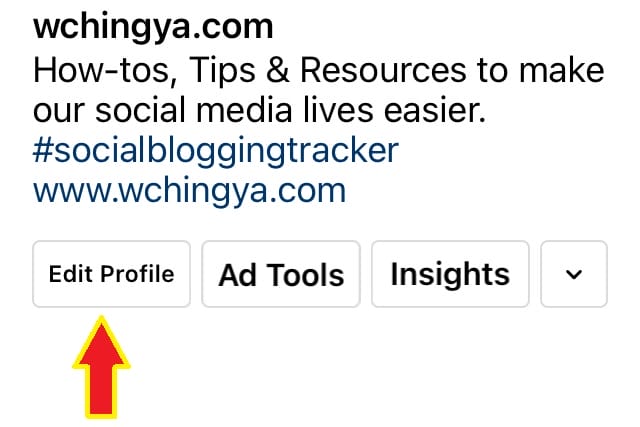
(Option 2): Look for ‘Edit Profile’ on your Instagram page.
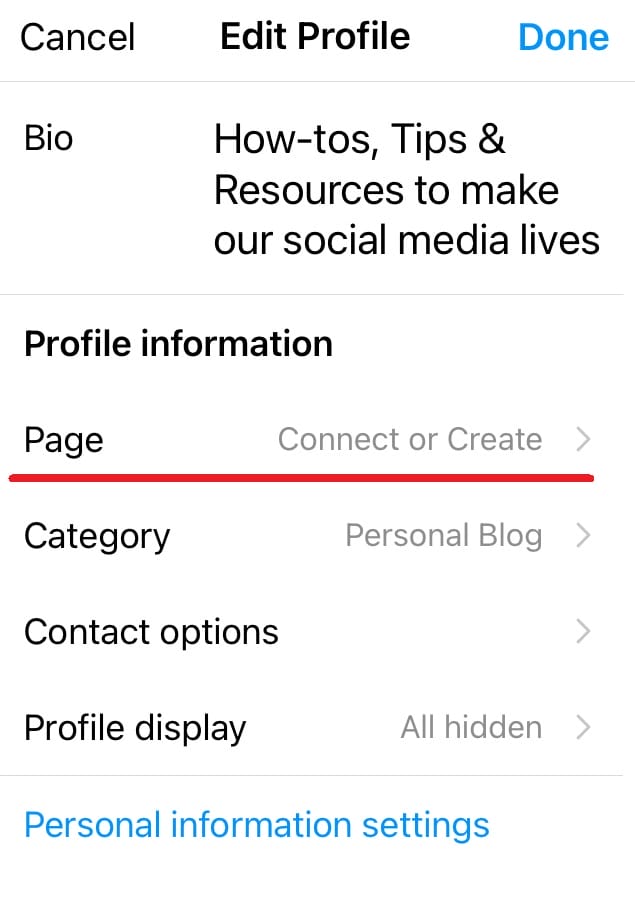
Scroll down and look for Profile Information > Page > Connect or Create
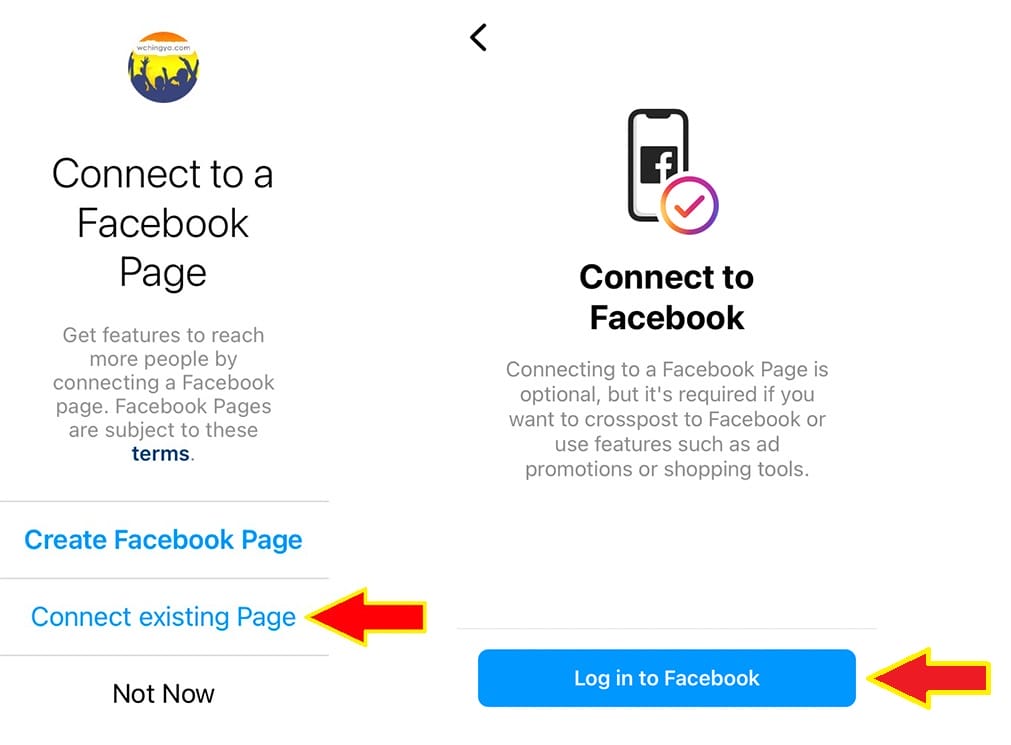
2. If you already have a Facebook Page, select ‘Connect existing Page’. Next, log in to your Facebook account.
3. To check if you’ve successfully connected, go back to Edit Profile > Page Information > Page.
Note: Don’t worry if you don’t see your page right away. It may take a while before it will appear.
Extra: To Disconnect Your Facebook Page from Instagram:
Go to Edit Profile > Profile Information > Page > Disconnect Page
STEP 2: How to Schedule Post to Instagram Using Creator Studio
Once your Facebook Page is successfully connected to your Instagram account, you can post or schedule photos/videos from Creator Studio’s dashboard and view post insights.
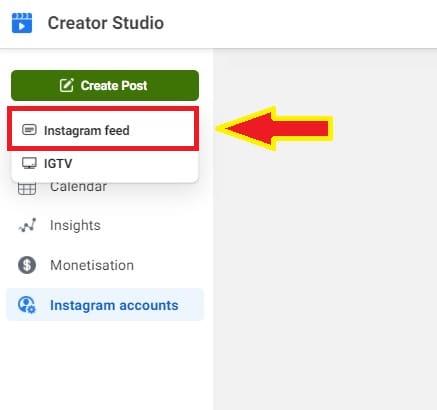
1. Click ‘Create Post’ > choose ‘Instagram feed’
To ensure smooth posting, make sure to follow these rules:
- no more than 30 mentions per post,
- no more than 30 hashtags per post,
- video length to be 3-60secs long with an aspect ratio between 4:5 and 16:9.
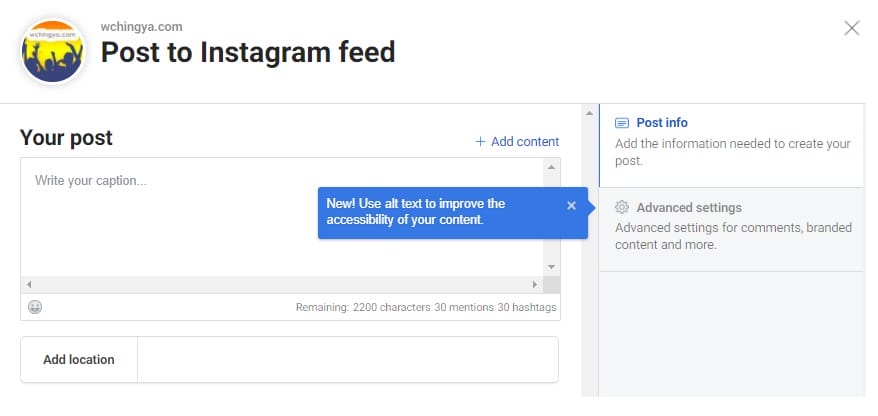
2. Upload your picture and add caption to it. You can tag people or ‘Add location’, or turn off commenting in ‘Advanced Settings’.
There’s also an option to post to your Facebook page simultaneously right below (you can ignore this by making sure the box is un-ticked).
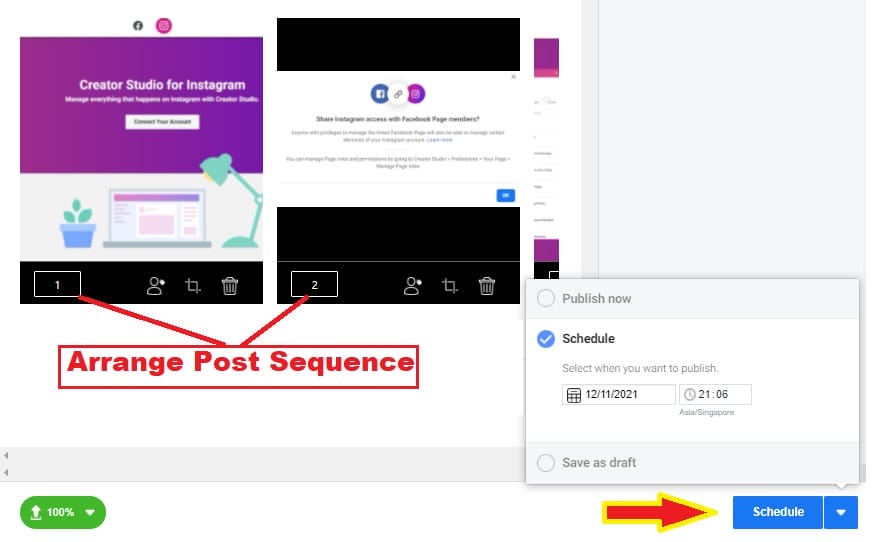
3. For carousel posts, you can arrange the pictures by keying in the numbers (instead of drag & drop). The number of photos you can upload is still limited to ten.
Once your post is ready, click at the down arrow beside the Publish button. Here you will have options to ‘Publish now’, ‘Schedule’ or ‘Save as Draft’.
4. To schedule your post, select the date and time to publish it. Click ‘Schedule’ once ready.
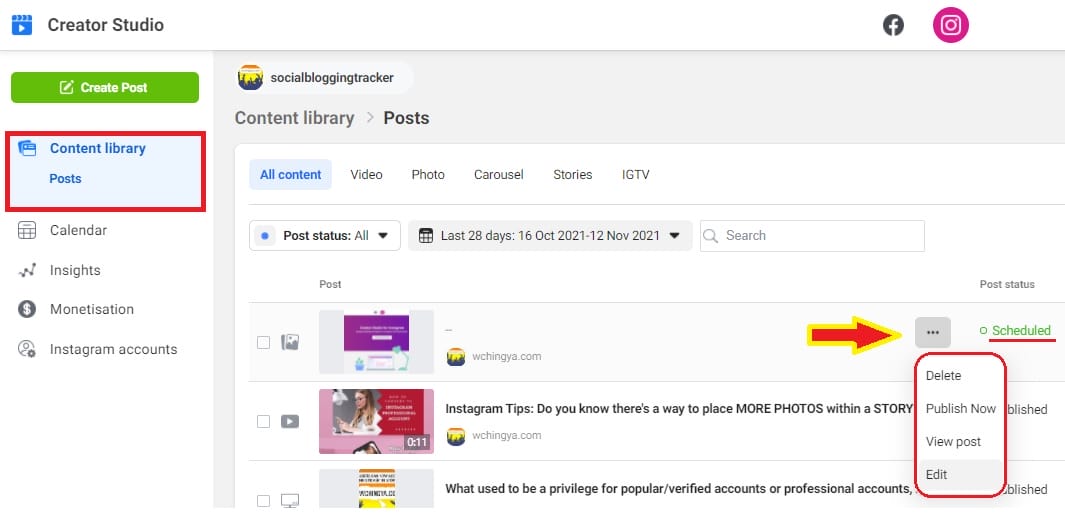
Note: Go to ‘Content Library’ to see all your scheduled posts/drafts.
STEP 3: How to Schedule Videos to Instagram Using Creator Studio
Scheduling videos to Instagram is slightly different from regular posts, especially from no.3 onwards:
1. Click Create Post > Instagram feed
Note: Make sure your videos to be 3-60secs long with an aspect ratio between 4:5 and 16:9.
‘IGTV’ has been rebranded so this option is no longer active. Whether it will be replaced by other options it remains to be seen.
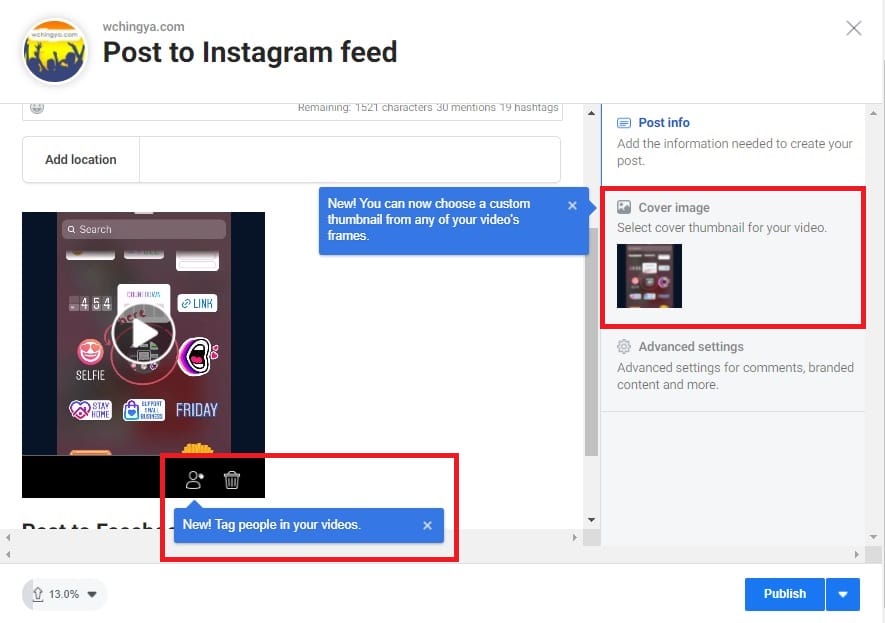
2. Upload your video and add description to it. Tag people or ‘Add location’ if need to. You can also add cover image for your video.
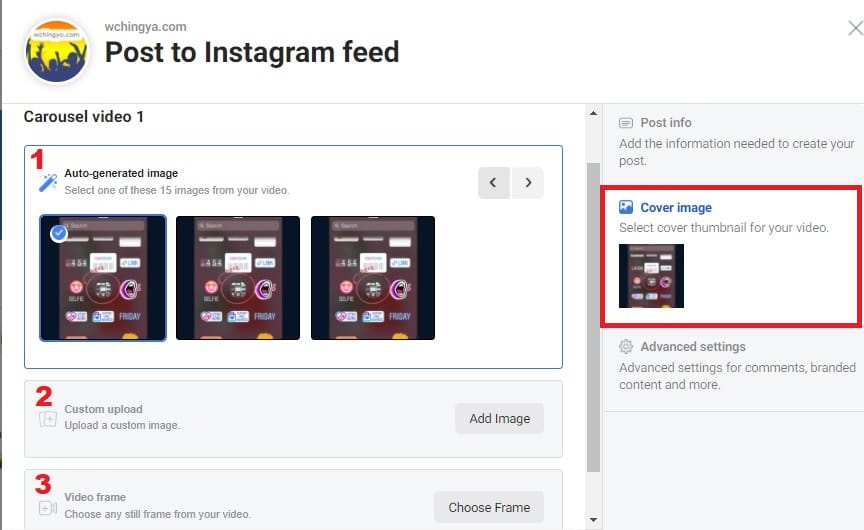
3. Set a custom thumbnail for your video in Cover image. Choose from the auto-generated images, video frame or custom upload.
The latter allows you to upload ready-image files from your own computer if have.
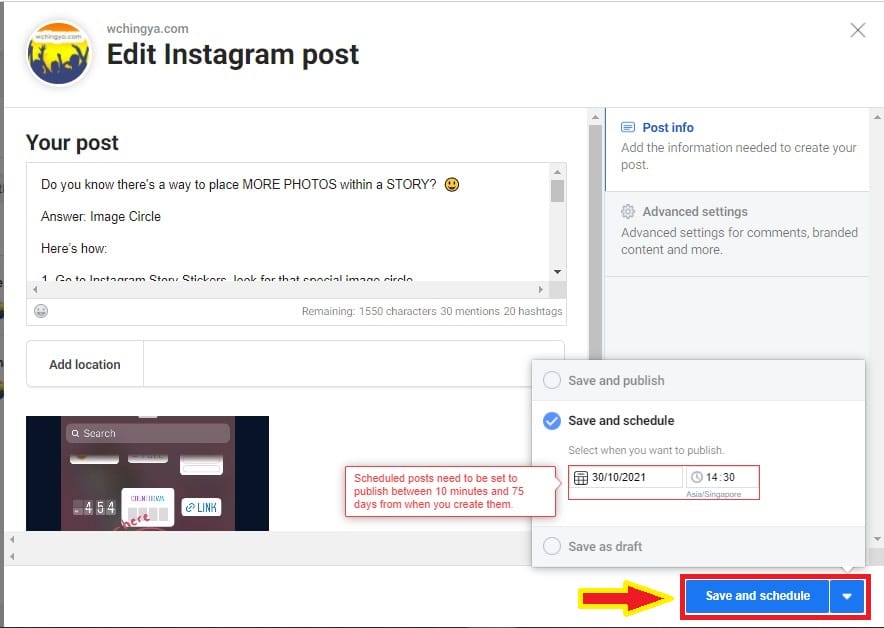
4. Click at the down arrow beside the Publish button and select ‘Schedule’. Set the date and time for your post, click ‘Save and Schedule’.
Note: Make sure your scheduled postings are set between 10 minutes and 75 days after they are uploaded.
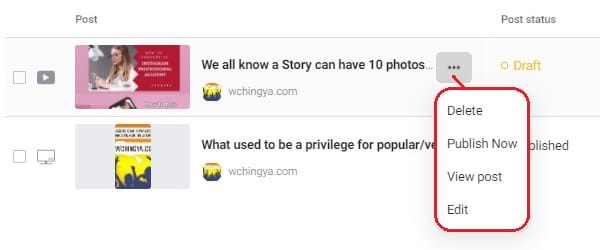
7. You can edit, publish or delete your scheduled posts in Content Library.
Limitations of Creator Studio
There are a few limitations when posting to Instagram using Creator Studio from PC:
- Lack of editing tools for pictures, such as brightening, rotating, zooming in/out.
- No filters
I would suggest to edit your pictures properly before uploading to save time. There are a few tools that can work wonders, and I’ll be introducing some of my favourites in the future posts.
BONUS: How to Adjust/Manage Connected Accounts in Instagram
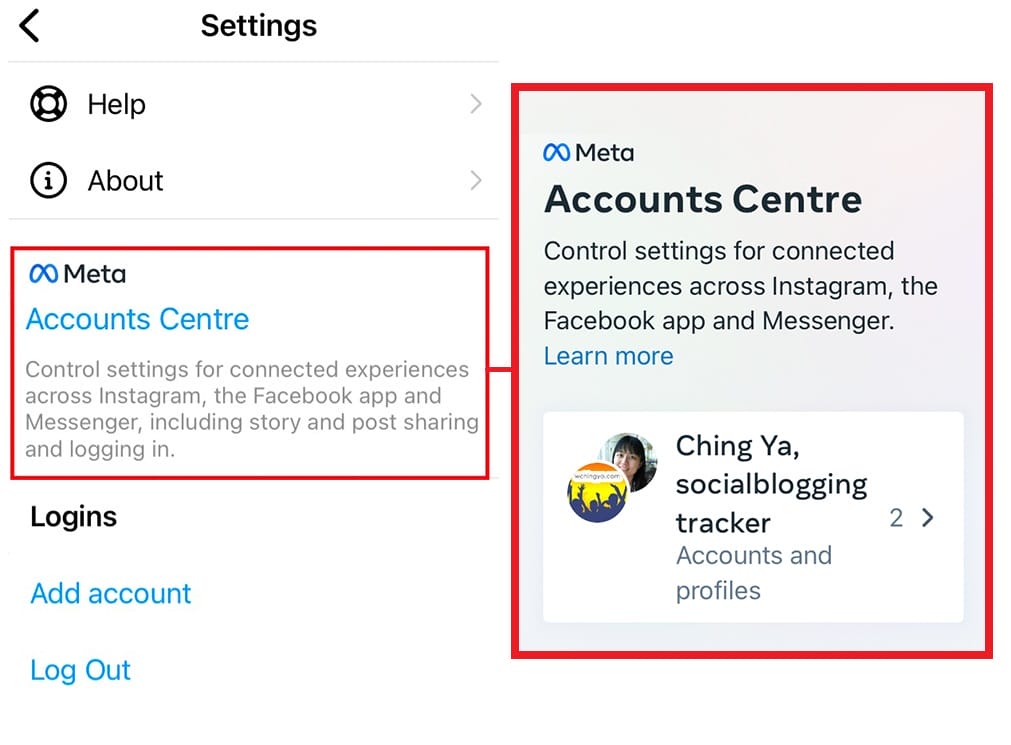
Go to Settings > Meta Accounts Centre (or formerly known as ‘Facebook Accounts Centre’). Here you will be able to view all your connected accounts.
To remove the selected profile/account, click at the account > ‘Remove from Accounts Centre’. You can also ‘Add accounts’ here to share stories and posts easily, including logging in between accounts.
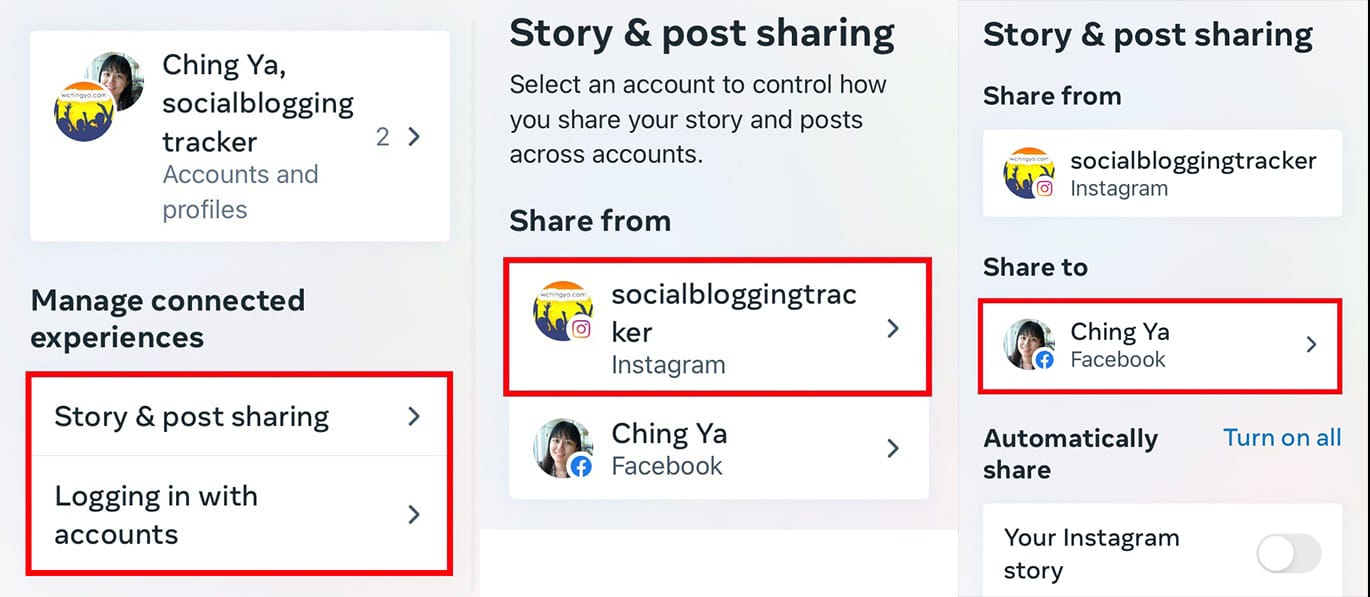
Manage Connected Experiences:
Story & Post Sharing:
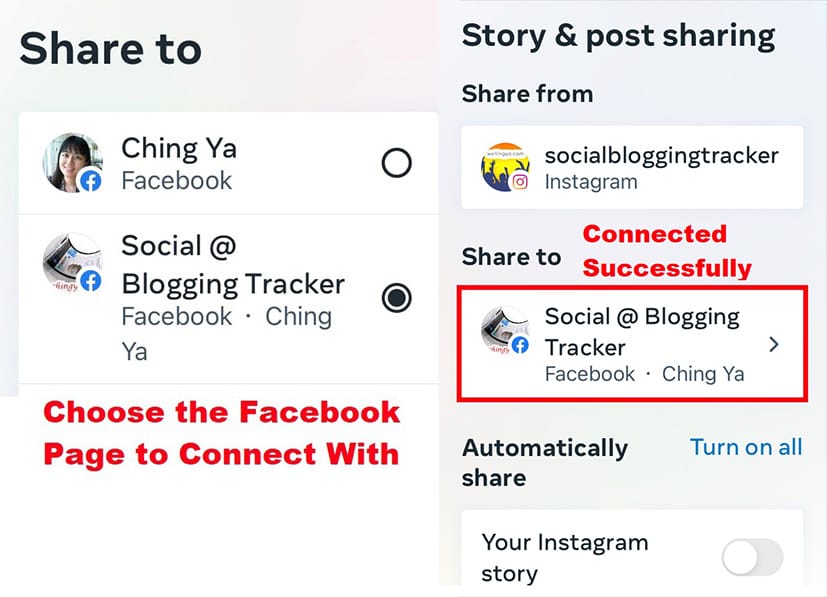
You can decide how you’d share your post, either from Instagram to Facebook Page or vice versa. This is also the place where you can select which Facebook Page to cross-post along with your Instagram account.
Choose Story & post sharing > Share from (your Instagram account) > Share to (your Facebook Profile)
As you’ve already connected to your Facebook account, from the list of your managed Facebook Pages, choose the Page that you wish to link to your Instagram account. Now, you can share posts/stories selectively or automatically from your Instagram account.
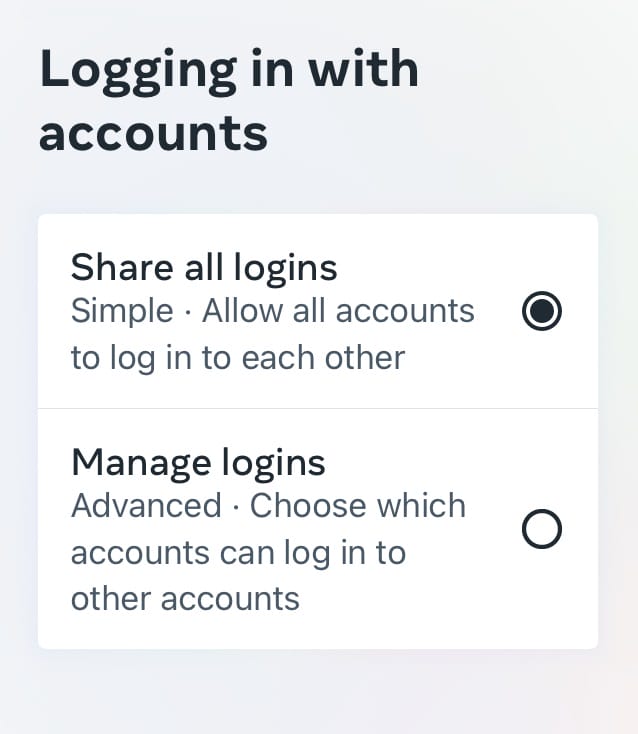
Logging in with Accounts:
Some users would like to keep account logins separated from one another. In that case, you can tweak the settings here with ‘Manage logins’, by choosing which account can log in to others.
Afterthought
Currently, I didn’t experience any conflicts in terms of reach when scheduling posts from Creator Studio. It’s actually quite convenient, and allows me to spend more time on drafting other social media posts while ensuring a smooth posting to Instagram. So, if you’re looking for a simple & easy way to schedule posts to Instagram, feel free to give Creator Studio a try!
MORE INSTAGRAM TIPS:
- 15+ Lesser-Known Instagram Tips, Features And How-To’s You May Have Missed
- How To Organize And Control Instagram Feed For Accounts You Follow
- How To Post To Instagram From PC
- How To Post Link On Instagram Story [With Link Sticker]
- How To Switch To Instagram Business Account From Your Personal Account
MORE TWITTER TIPS:
MORE FACEBOOK TIPS:
- How to Change Page Name, Username and Facebook Access (and MORE) in New Page Experience
- How To Comment As Your Facebook Business Page On Other Facebook Pages
- How To Add Official Facebook Page To Your Personal Profile
- How To Separate Your Facebook Page From Personal Profile
- 15 Practical Ways To Protect Your Facebook Profile From Facebook Page
- How To Find Your Pending Friend Requests (And Sent Requests) On Facebook
- How To Connect A Facebook Group To Your Facebook Page
