20+ Lesser-Known Instagram Tips, Features and How-To’s You May Have Missed (2024)
In recent years, I’ve been quite an avid user of Instagram. I’m quite intrigued by it, mostly because my friends are on it and they seem to enjoy it more than Facebook. I’ve grown to appreciate it as well, after discovering that it’s not just a “snap and post” kind of platform. After discovering more useful features within, it actually helps to make my Instagram experience less of a hassle.
So whether you’re just starting to use Instagram or are already an old-timer, I hope you’ll find some useful Instagram tips that make you go “Huh? I wish I knew this sooner!”
I know I have.
Handy Instagram Tips, Features and How-To’s You MUST KNOW
Table of Contents
#1 How to Mark Your Instagram DMs as Unread
I’m embarrassed to say that I’ve been neglecting this feature for a long time, not knowing that it existed in the mobile app version.
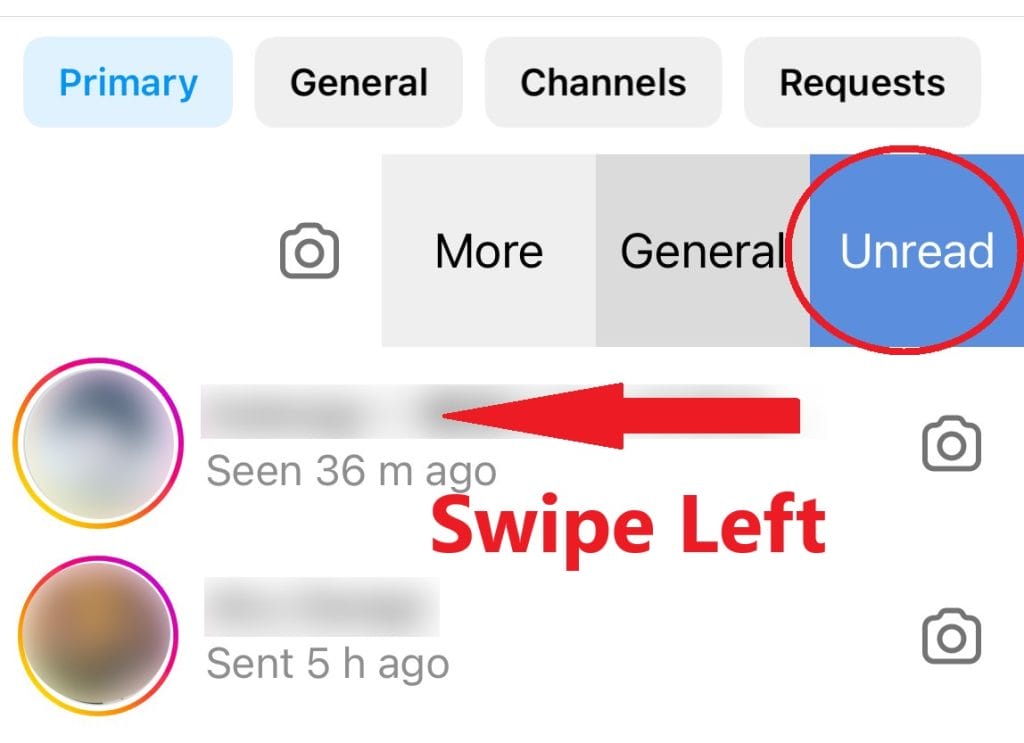
Go to your DMs, select that particular chat, swipe left > select Unread.
You can even use the same feature to move the chat to General, Primary, Flag, Mute, or even Delete.
Now you can safely read the message and mark it as Unread to conveniently come back to it later.
This also works for the Channels you subscribe to.
#2 How to Create Saved Replies and FAQs on Instagram
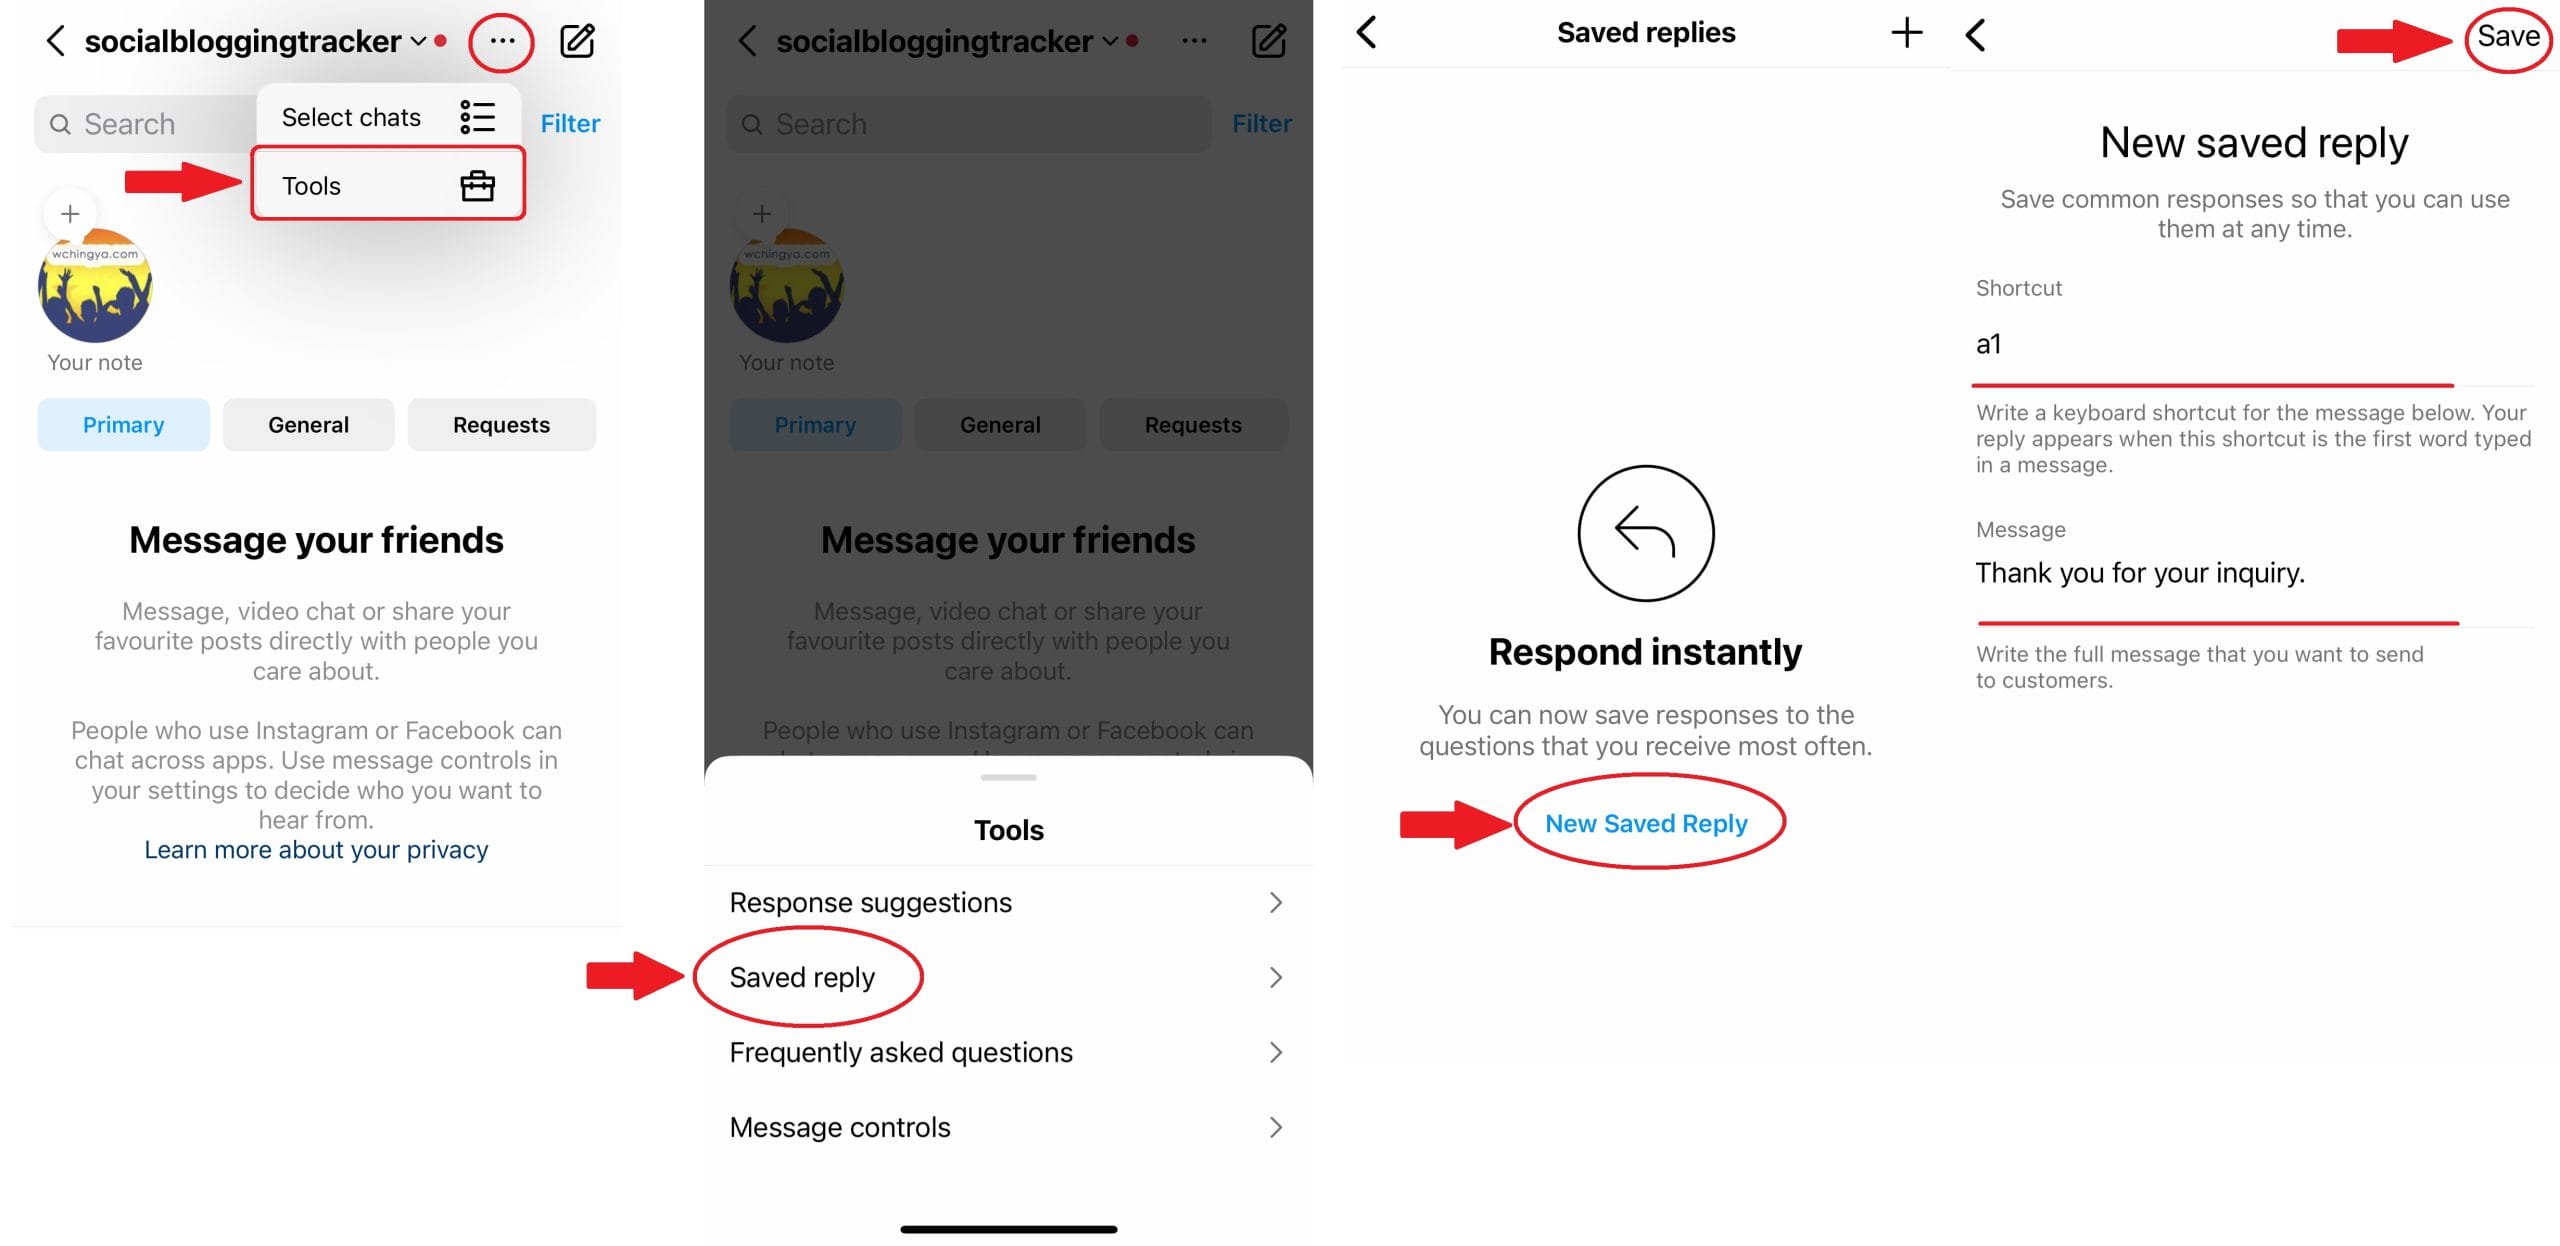
This is a handy tool in chats. You can now create keyboard shortcuts for common responses to inquiries. All you need to do is click on the three dots in the upper right corner of your DMs > select Tools > Saved replies.
Click New Saved Reply. Enter the Shortcut of your choice, then the full Message that you want to send using the shortcut. You can create multiple Saved replies.
Do take note that this is different than auto-responder (such as Frequently Asked Questions), as you still need to type out the shortcut to reply.
However, you can customize your page’s FAQs in this section as well.
#3 How to Create a Channel to Reach Followers
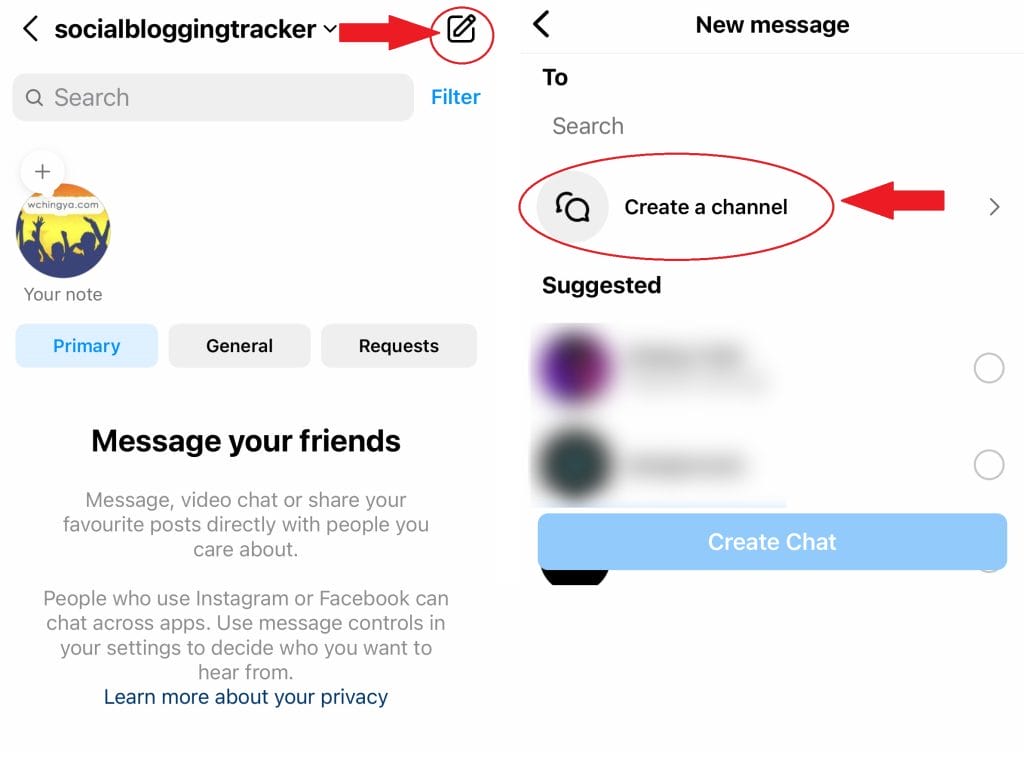
To create a Channel for your Instagram page, go to New Message > Create a channel
While Channel allows you to message followers directly to share updates, create conversations, and share updates, other people may still be able to discover and join your channel right from your Profile page.
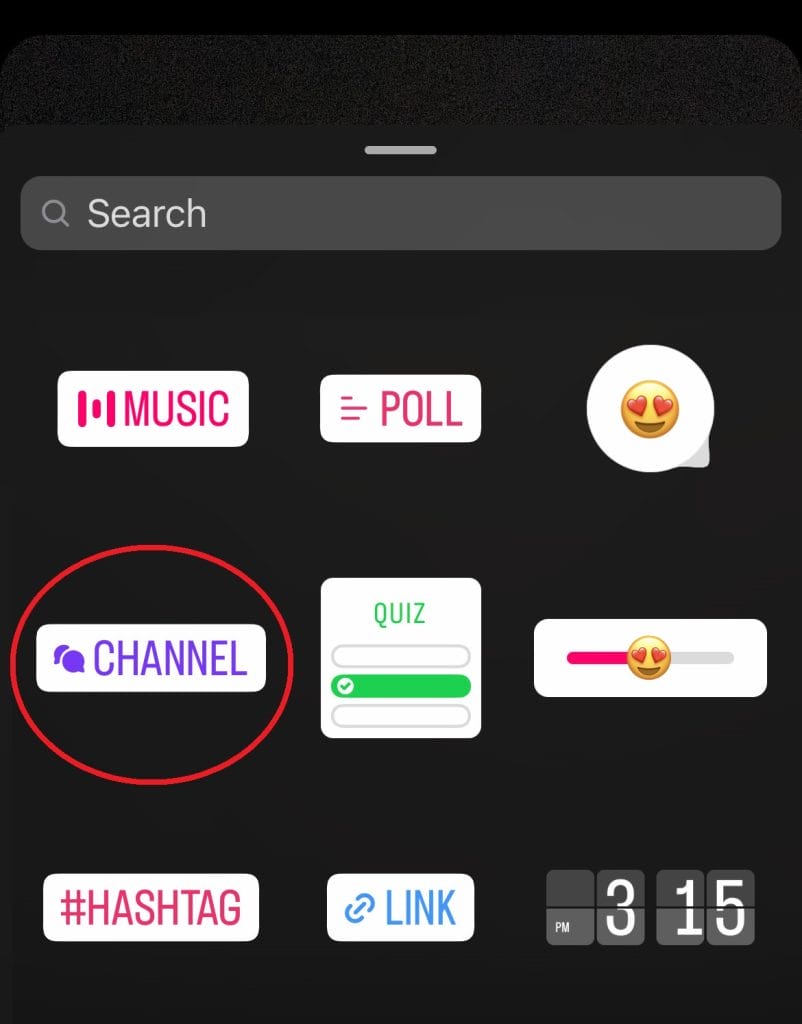
Also, you can post your Channel on your Instagram Story – just add the “Channel” sticker will do, but only if you’ve already created a Channel before this.
So think of this as a new way to reach out to your audience. With people complaining about low visibility on Instagram these days, use it sparingly and wisely without spamming your followers.
#4 How to Add More Than One Link in Your Instagram Bio
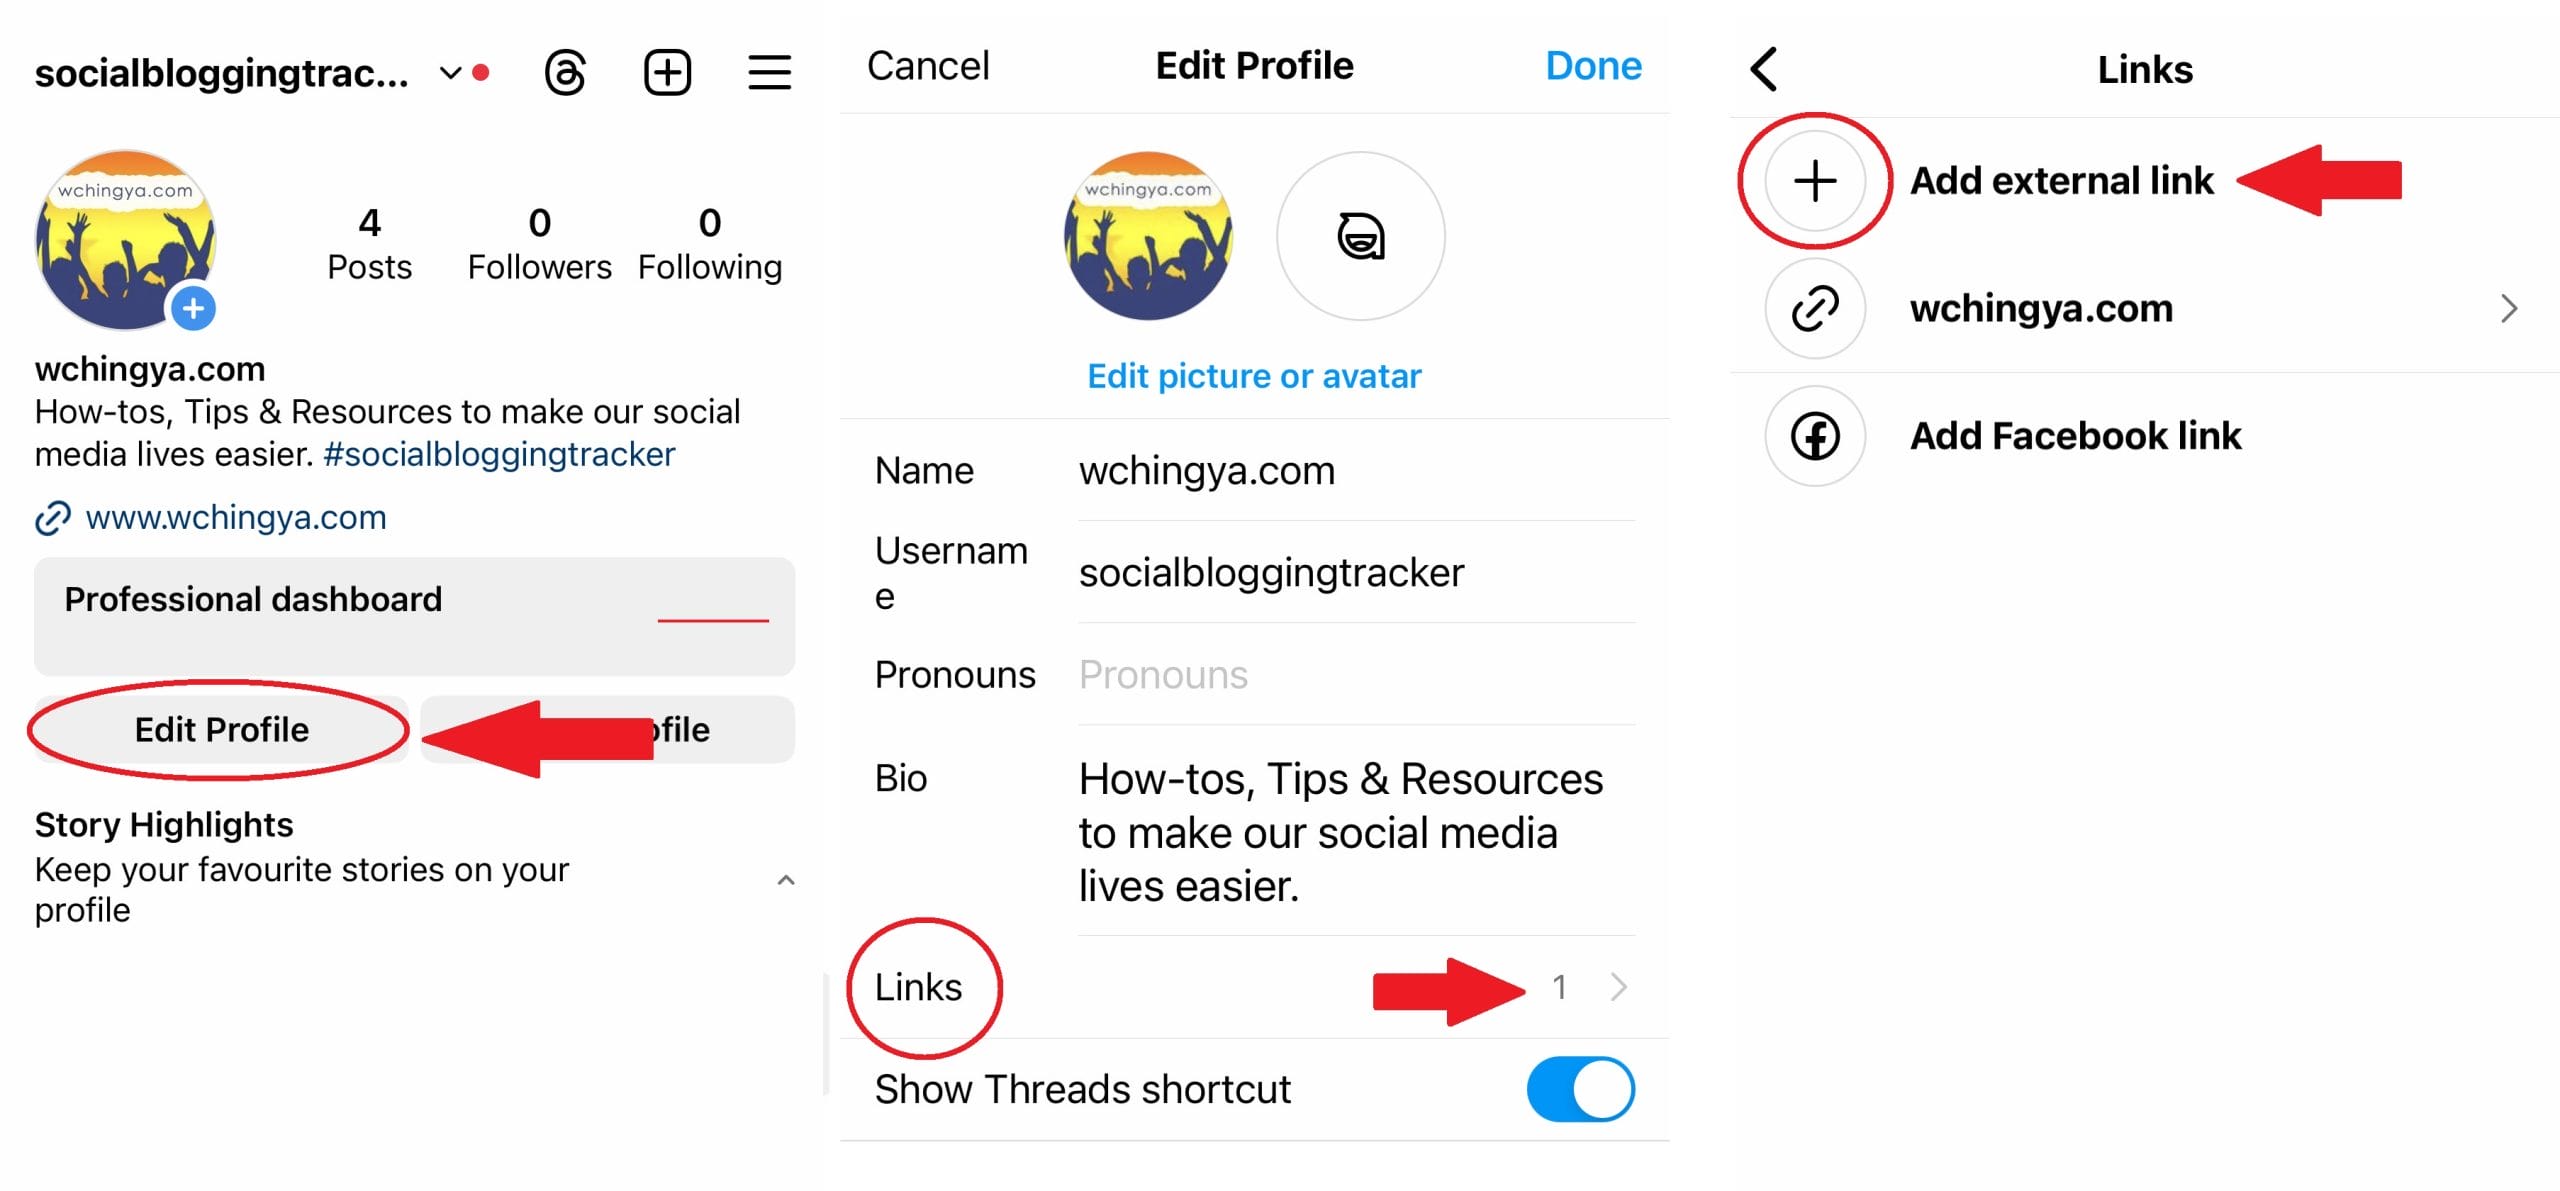
Actually, this is an updated option in which you can now add up to five links to your bio.
Go to Edit Profile > Links > Add external link, to start adding your websites, social media profiles etc.
If you are not aware of this method, be sure to use it to maximise your brand’s outreach.
#5 How to Add Captions to Your Instagram Stories and Instagram Reels
This is one little feature I don’t get to enjoy currently since it is only available in English-speaking countries.
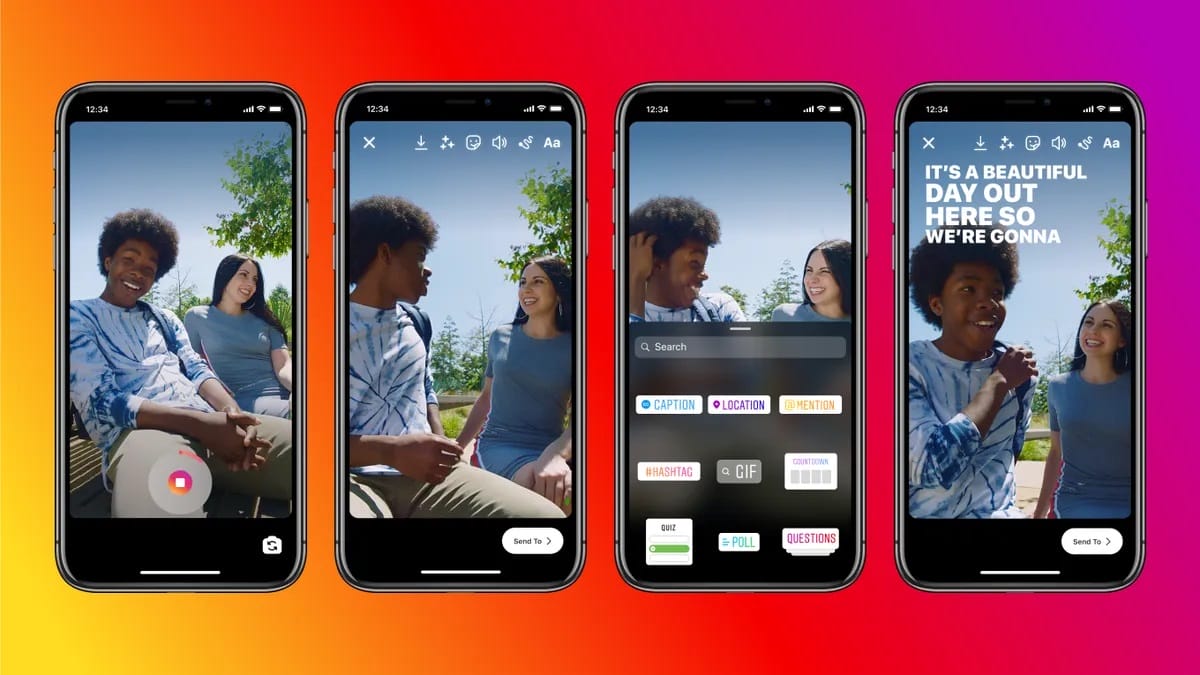
It is said that you can easily add an auto-generated Caption sticker to both your Instagram Reels and Stories. This is particularly handy if you have uploaded a reel with original speaking audio.
Let’s hope this feature will roll out to everyone, regardless of where people reside.
#6 How to Block Instagram Spammy Comments Containing Certain Words
For spammy commenters, we can choose to delete, block, or report the commenter so he or she won’t be able to comment again on our page.
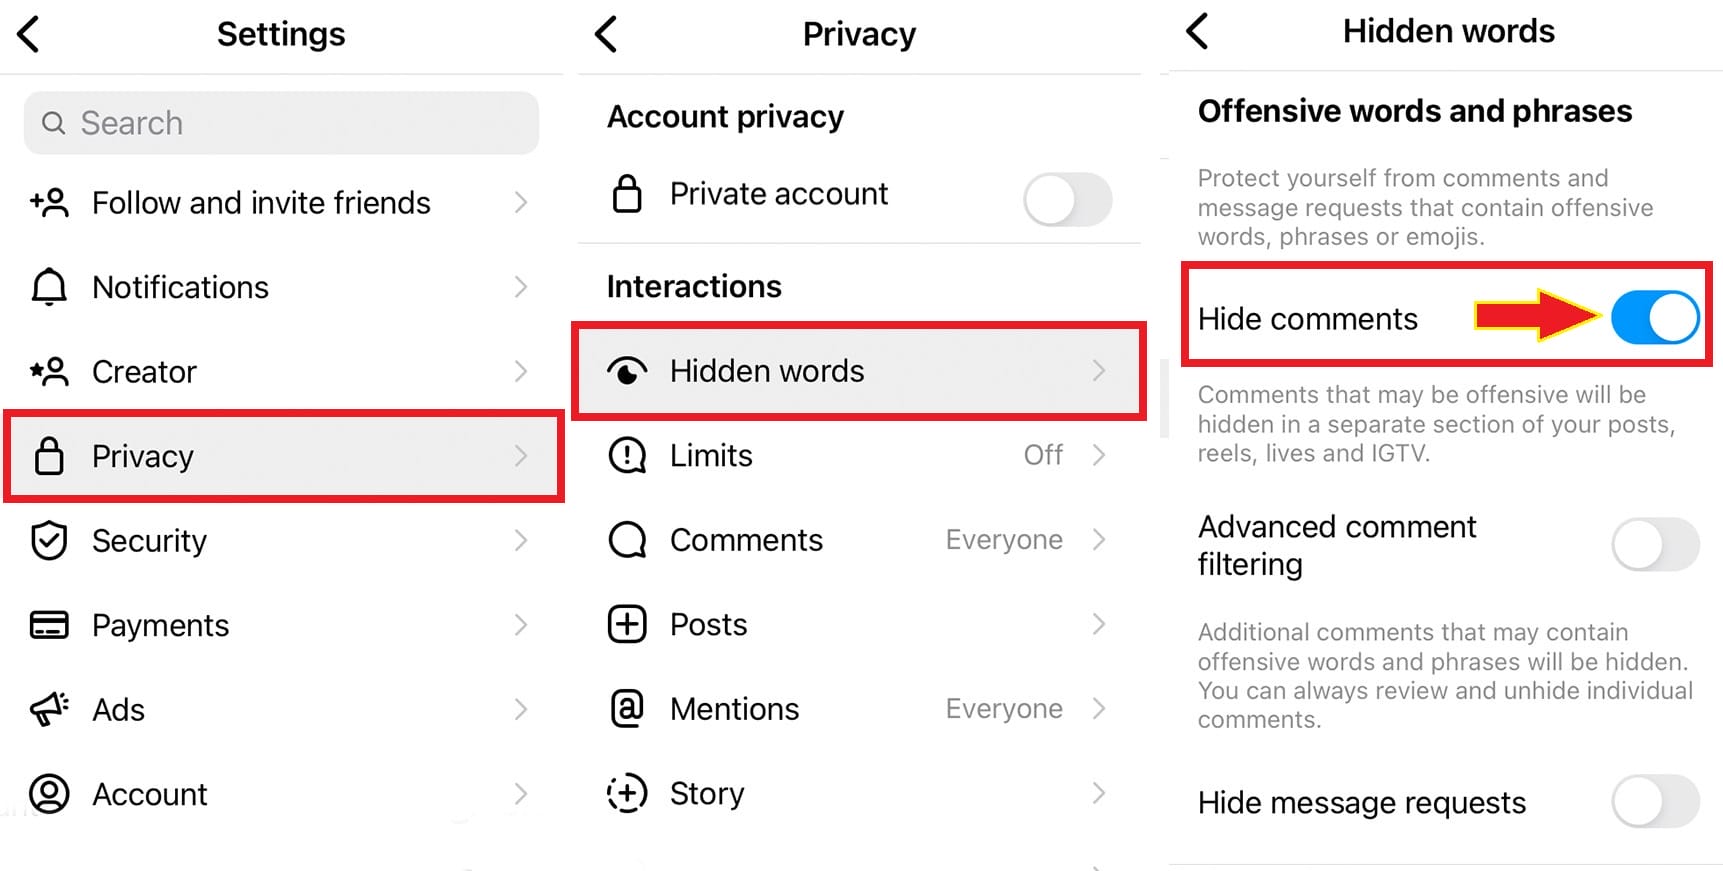
If the problem persists, turn on your filter for offensive words and phrases:
- Go to Settings > Privacy > (Interactions) Hidden Words > Hide comments (TURN ON)
You can even turn on “Advanced comment filtering” so that these comments will be hidden, which you can then review and unhide individual comments if need to.
But what if your commenters are relentlessly promoting a certain product or service all over your Instagram page?
There may be random bots, and sometimes it’s hard to block just one, as they may have hundreds of fake accounts up their sleeves. If that’s the case, we can plan ahead to stop the comments by identifying the keywords they used.
Tweak the below settings to prevent the same spammy comment from different users:
(On PC)
- Go to Privacy and Security > Comments > Edit Comment Settings > Comment Filtering
Or easier yet, go straight to this link to access the comment settings.
In the “Keyword Filters” box, type in the words or phrases in which the comments that contain any of these words/phrases will be hidden from appearing on your Instagram posts.
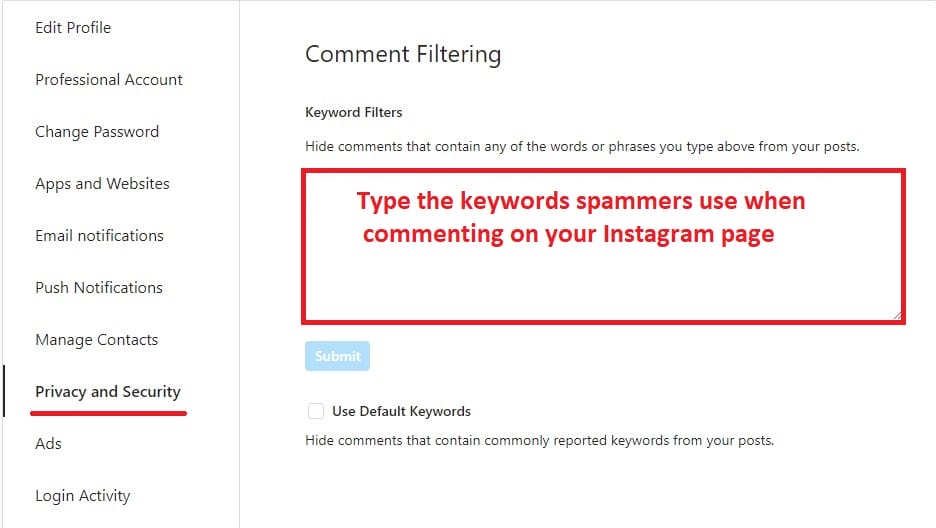
You can also choose to hide comments that contain commonly reported keywords by checking the “Use Default Keywords” box.
However, in my experience, the “keyword filters” option is far more effective in stopping more targeted, repeated spammy comments that appear constantly on your Instagram page.
(On Mobile)
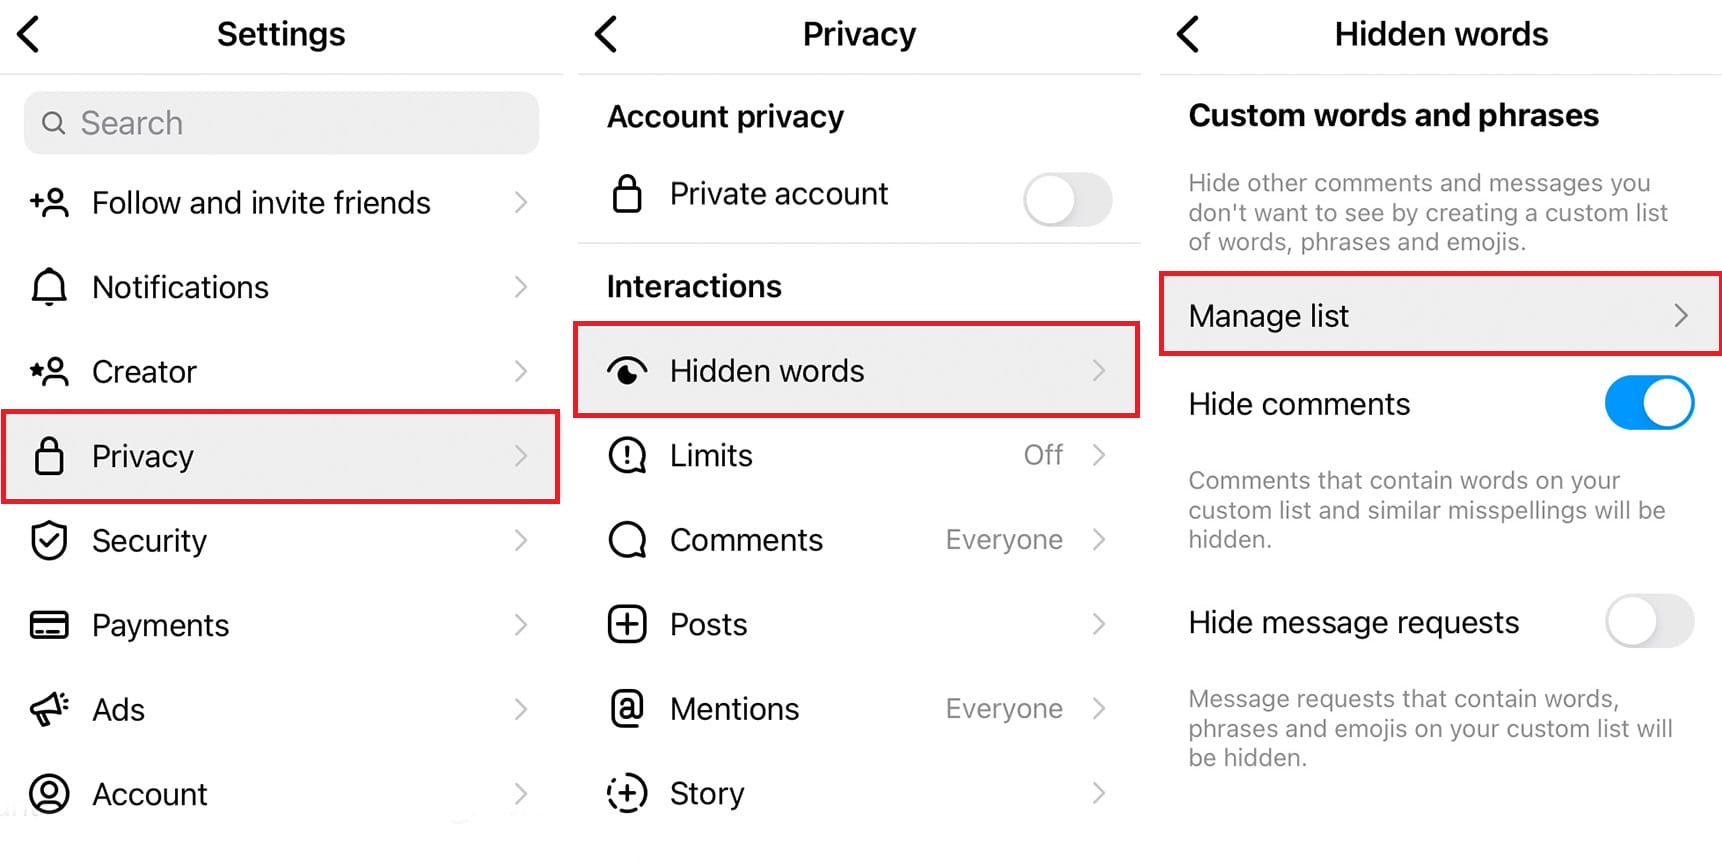
- Settings > Privacy > (Interactions) Hidden Words > (Custom words and phrases) Manage list
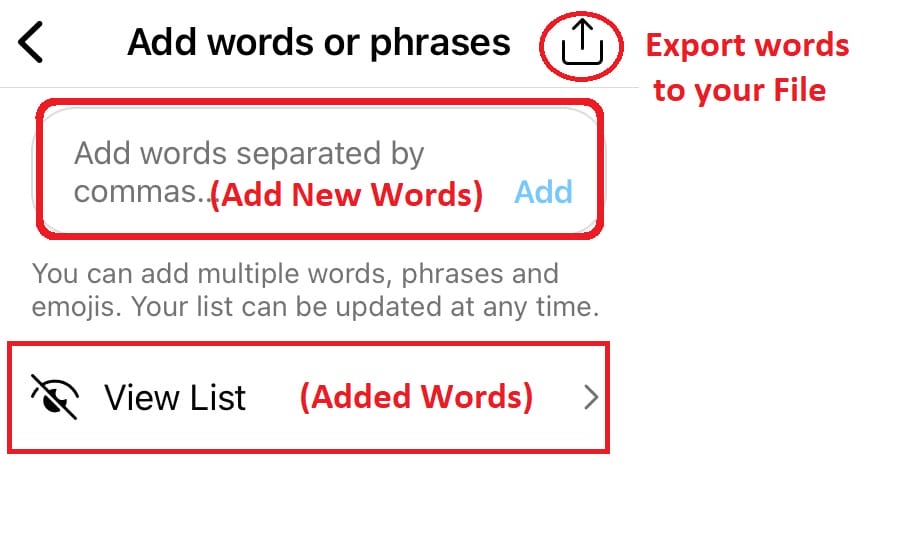
Here you can “View List” to see the previous words you’ve already added. Or you can add words separated by commas in the box above, then click “Add.”
This also works with phrases and emojis.
There’s also an upload button in the upper right corner that allows you to export the words to your files (on your phone).
A pretty handy tool if you need to keep the words/phrases for future reference.
#7 How to Contact Instagram using Report Forms: Offensive Content and Copyright Infringement
Usually, an Instagram user can instantly report a profile or post that contains hate speech, harassing, violent or suicidal content, scams, spreading false information, spammy etc. Here are some of the forms you can use to report to Instagram:
-
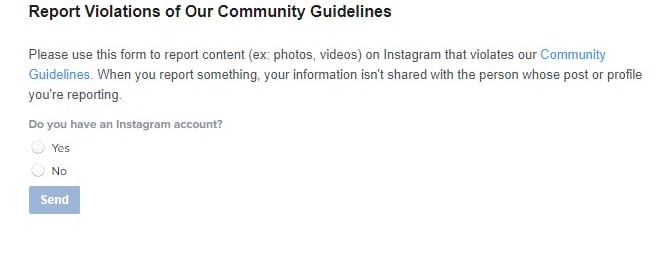
Report Violations of Instagram Community Guidelines
If you don’t own an Instagram account, you can still report it using this form.
-
Report Copyright Infringement on Instagram
Use this form to report if someone posts your original work without permission or claiming it to be their own. Remember, abuse this form will lead to the termination of your account. So, unless you’re very sure of what you’re doing, don’t simply use it.
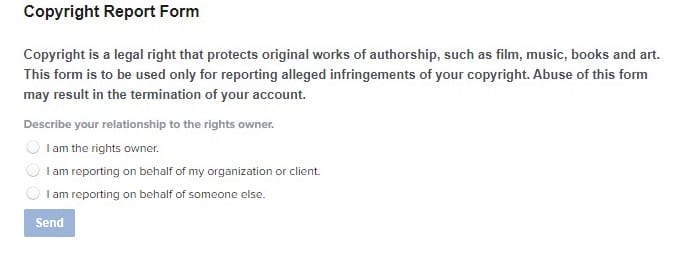
Some examples of the original works include books, music, film, art, and authorship. You can also submit this report on behalf of your client, organization or others.
-
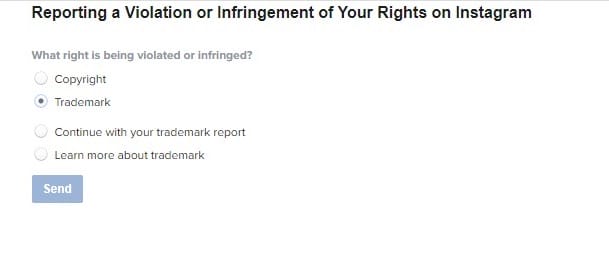
Report Violation or Infringement of Your Rights on Instagram
Another way you can report copyright or trademark infringement issues is to fill in this form.
-
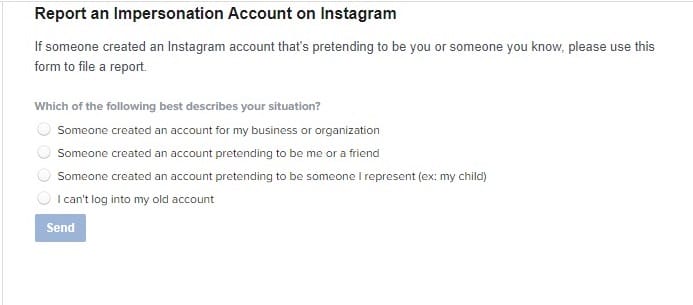
Report an Impersonation Account on Instagram
If someone is impersonating you or someone you know on Instagram, report the fake account using this form.
What if Instagram Denies Your Report and You Don’t Agree with the Decision?
Scenario #1:
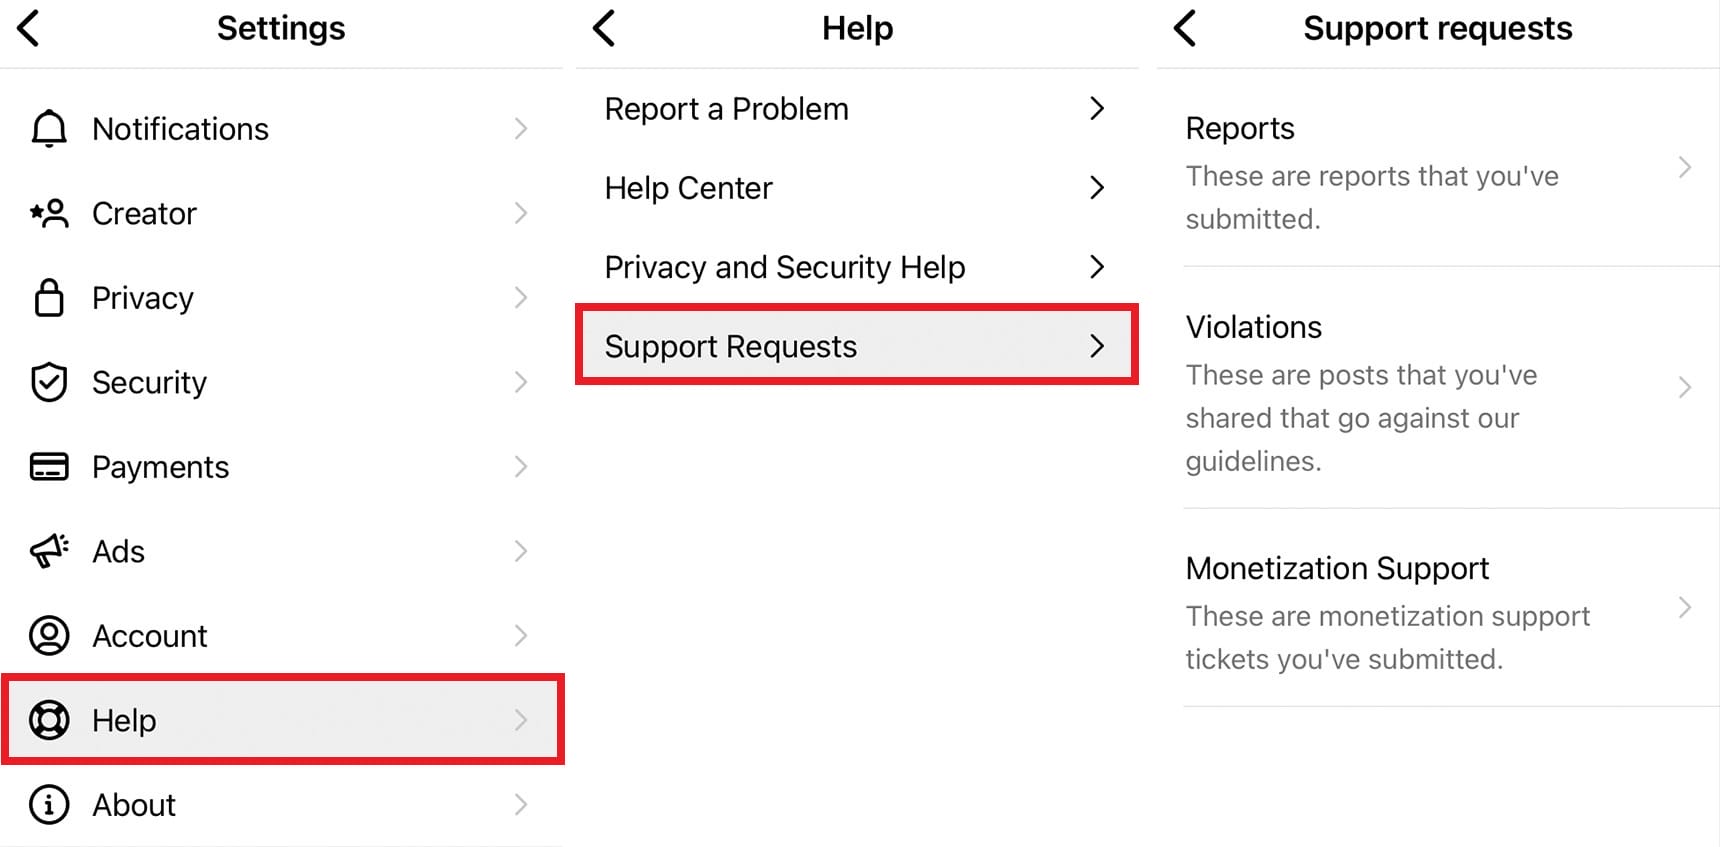
Let’s say, if Instagram refused to take down the reported content after you submitted the form, and you disagree with their decision, you can request a second review:
- Go to Settings > Help > Support requests > Reports > More Options/Support Options > Request review
For certain types of content or cases, Instagram doesn’t give the option for a second review. I know, it can be quite a headache.
In my case, there’s one particular account that copied word for word whatever I posted on Instagram, including the images! I reported it and this is the response I received.
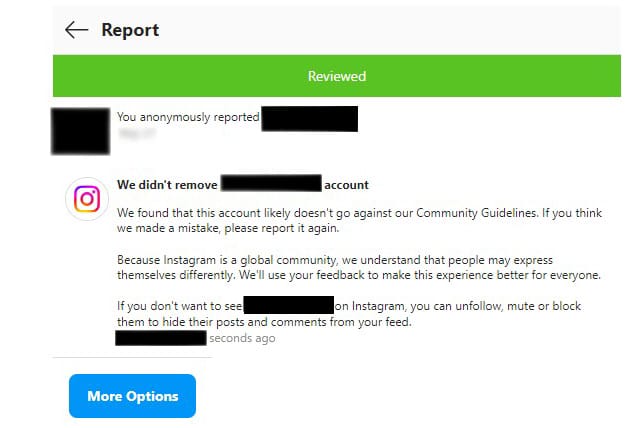
I just might report again if the user continues to copy my content. However, for now, just as Instagram suggested, I blocked the user so he/she/bot won’t be able to view my content. We’ll see what happens.
Scenario #2:
If you were reported for a violation or your content was removed by Instagram and you disagree, you can appeal using ANY of the following methods:
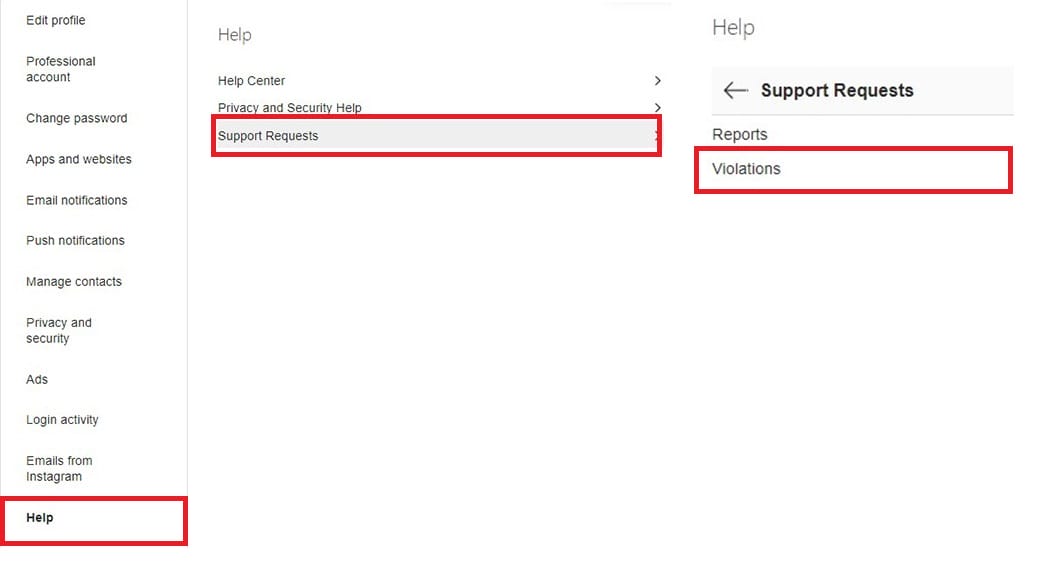
(On PC) METHOD 1:
- Settings > Help > Support Requests > Violations > Open the decision update Instagram sent you, tap More Options > Request Review > Close
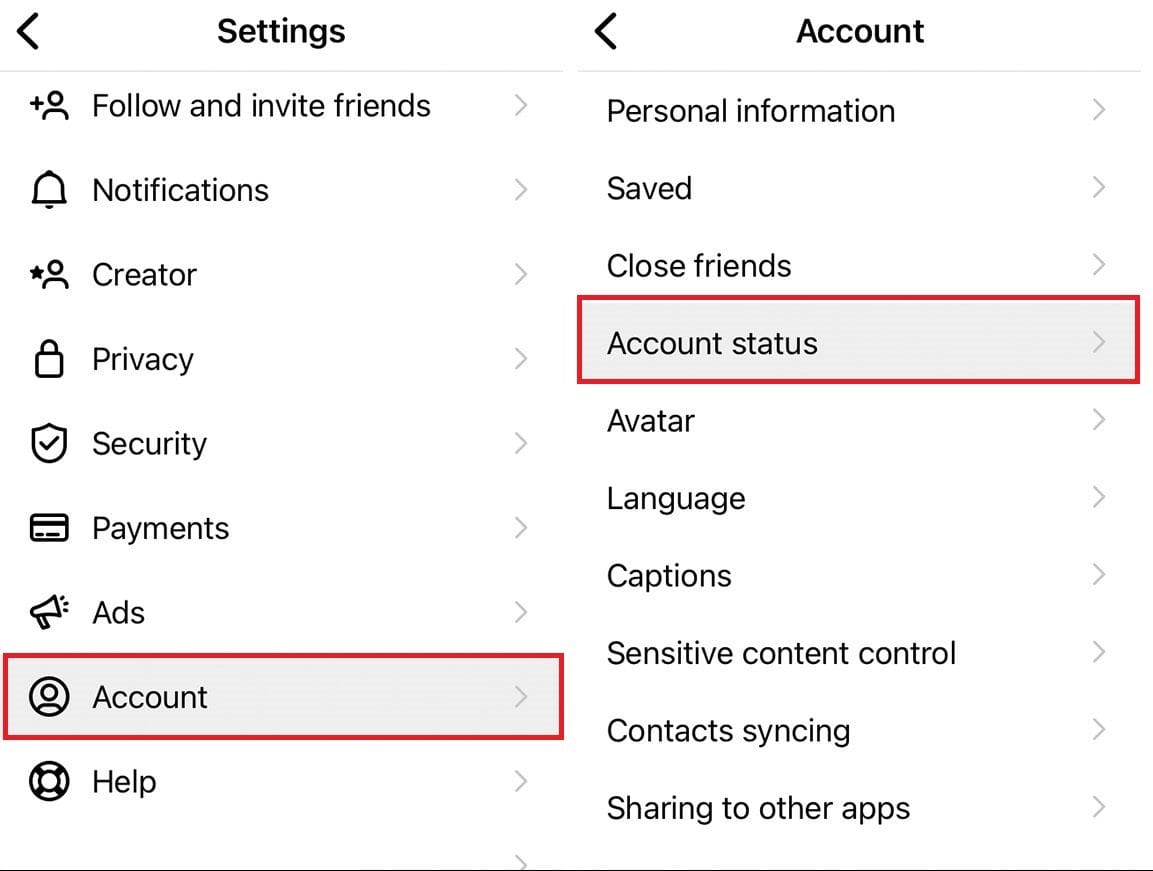
(On Mobile) METHOD 2:
- Settings > Account > Account Status > Tap the removed content, then Request a Review > Submit request > Done.
Only if you did either one of the above and received a second response from Instagram denying your request for the second time, can you try to appeal to the Oversight Board.
But, only if you’ve been given an Oversight Board Reference number. Otherwise, this option is another dead end.
#8 How to See Less Sensitive Content on Instagram
This isn’t new, but not long ago, more areas were included if you’ve tweaked the limit sensitive content in your Instagram settings, such as other people’s (accounts you don’t follow) feeds, Reels, search results, and Explore.
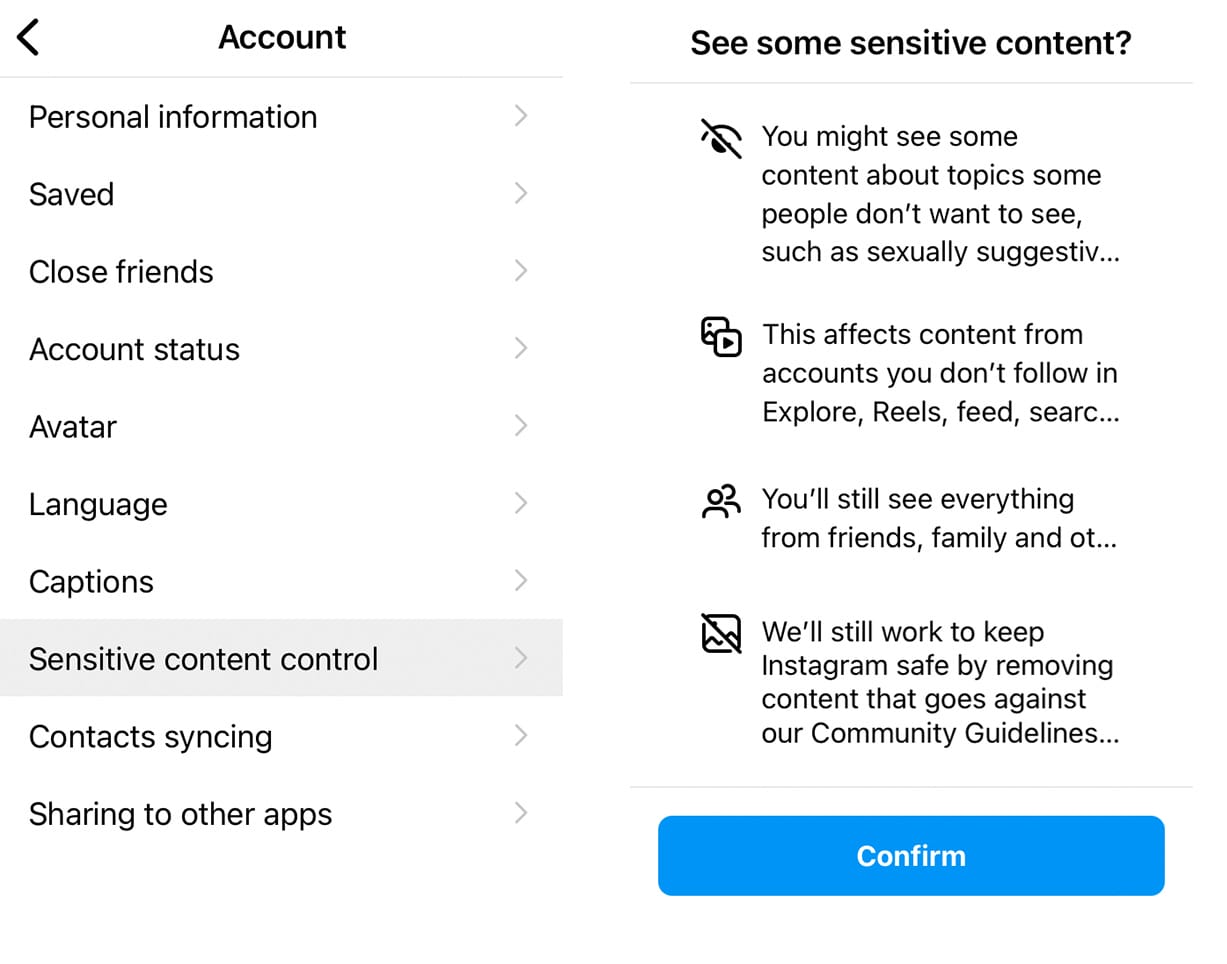
- Go to Settings > Accounts > Sensitive content control
Here you will be given the option to choose either “More”, “Standard” (see image below) or “Less.”
After your selection, click “Confirm.”
Although you’ll still see everything from your friends and family.
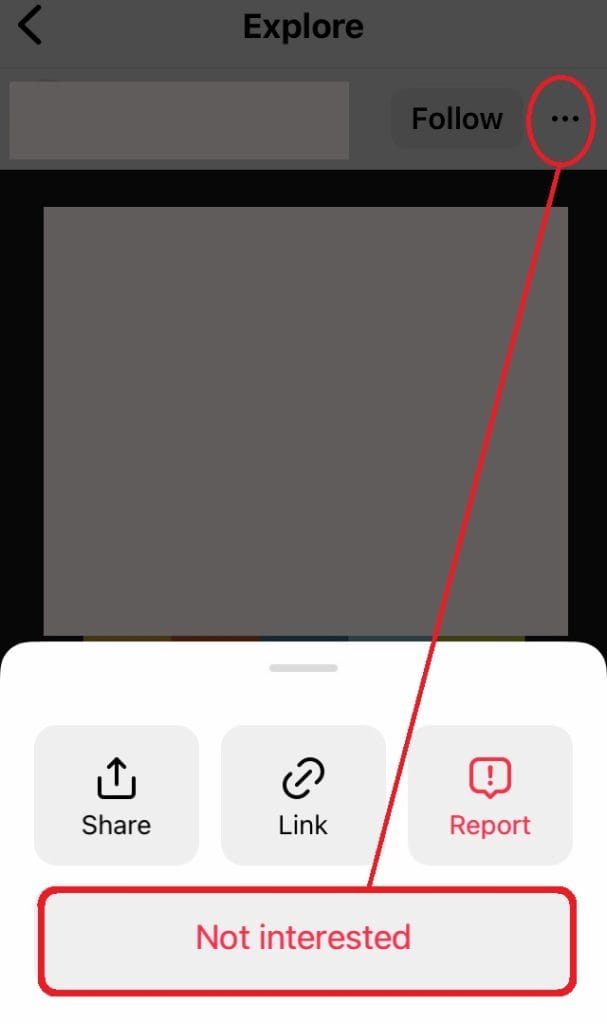
#9 How to Tell Instagram You’re Not Interested in Certain Posts or Results
Do you know you can prevent certain content from keep showing up in your feed, Explore and search results?
Simply click the three dots icon on the post you didn’t like, then choose “Not interested.”
Hopefully, you will be shown fewer similar content.
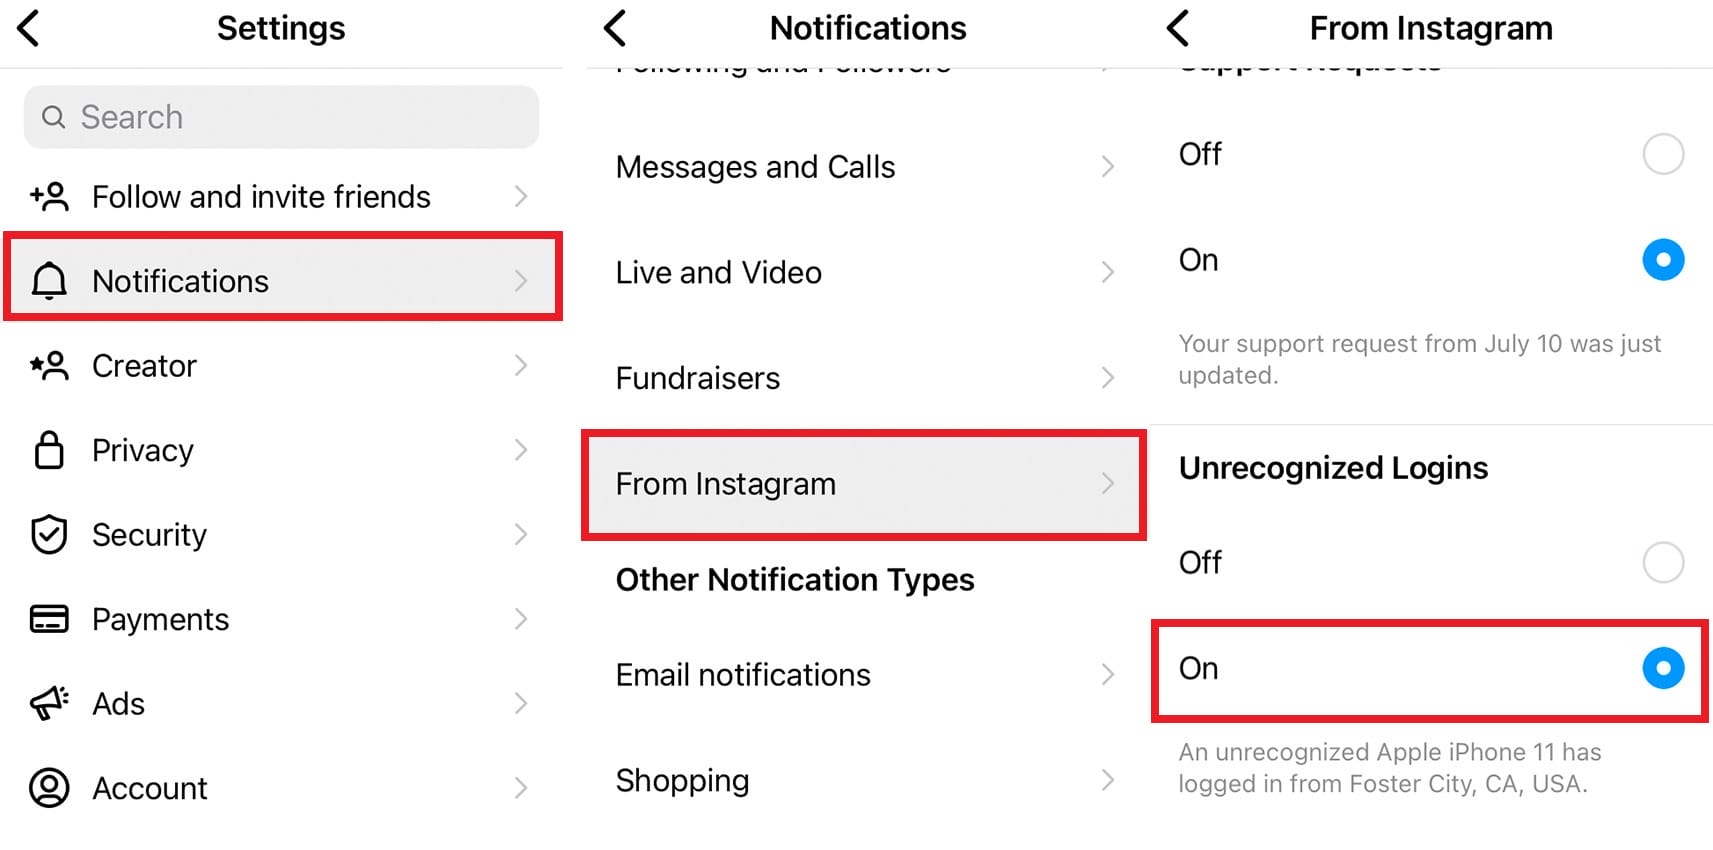
#10 How to Set an Instagram Alert for Unrecognized Logins as Soon as They Happen
Some may be tired of all the Instagram notifications, but personally, I think this is one of those crucial ones that you need to keep it on to prevent hacking and people stealing your account, as soon as it happens:
- Settings > Notifications > From Instagram > Unrecognized Logins (TOGGLE “ON”)
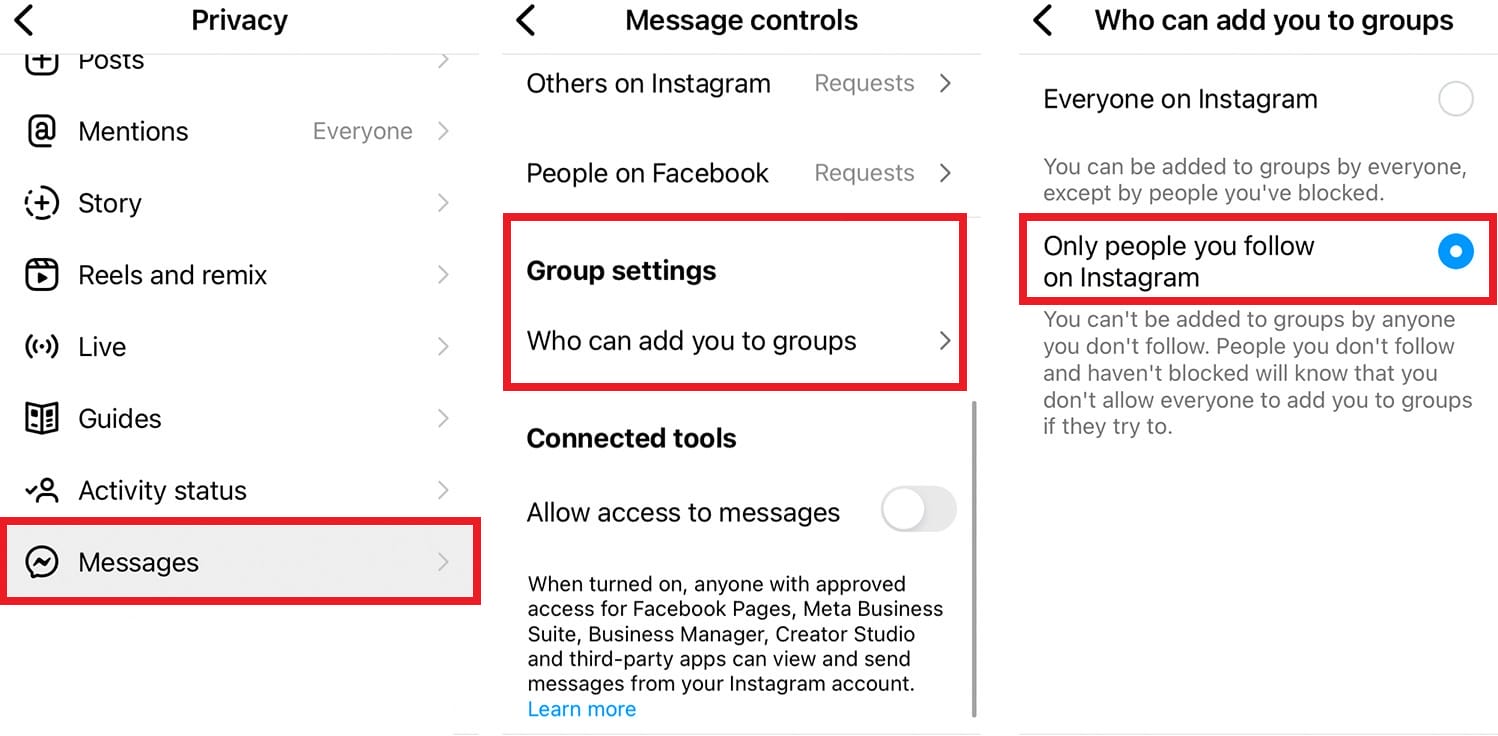
#11 How to Stop Someone from Adding you to Instagram Groups
I’ve seen people adding me to Instagram chat groups that I’m not interested in, and usually it appears in the Message Requests section. So, be sure to check this section more often.
Here’s how you can lessen the adding (since you can’t stop someone from adding you entirely):
- Go to Settings > Privacy > Messages > (Group Settings) Who can add you to groups > Only people you follow on Instagram
Let’s face it, it’s better than letting any random stranger (“Everyone on Instagram”) do it.
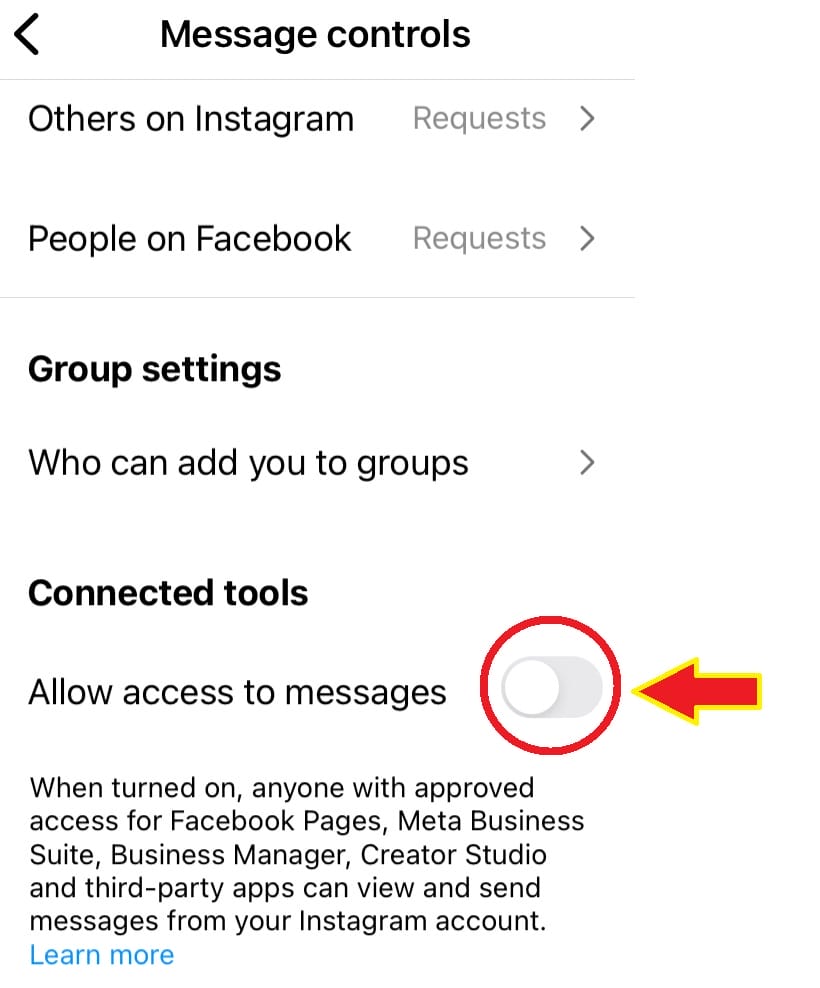
#12 How to Prevent People from Sending Messages Through your Instagram Account
This includes individuals, social managers, or companies that manage your connected Facebook Pages, Meta Business Suite, Business Manager, Creator Studio or other third party apps that have access to your Instagram account.
If you don’t want them to send Instagram private messages from your account, be sure to turn off this option:
- Go to Settings > Privacy > Messages > Connected tools > Allow access to messages (TOGGLE “OFF”)
#13 How to View All Your Past Activities on Instagram
This section is like a vault, keeping all your past activities.
Go to Your Activity, and from there you can see:
- Time spent
- Photos and videos
- Interactions
- Account history
- Recent searches
- Links you’ve visited
- Archived
- Recently deleted
- Download your information
What’s great about this section is that you can use the “Sort & filter” for your search results. There are different filters you can use: “Author”, “Start date” and “End date.”
It’s fascinating that Instagram actually kept all your likes, comments etc. and dated back to when your account first joined Instagram. It’s both amazing and scary at the same time.
But the bright side is, you can now sort through your search results to find that particular post you’ve liked or that comment you wish to remove. There are different filters you can use: “Author”, “Start date” and “End date.”
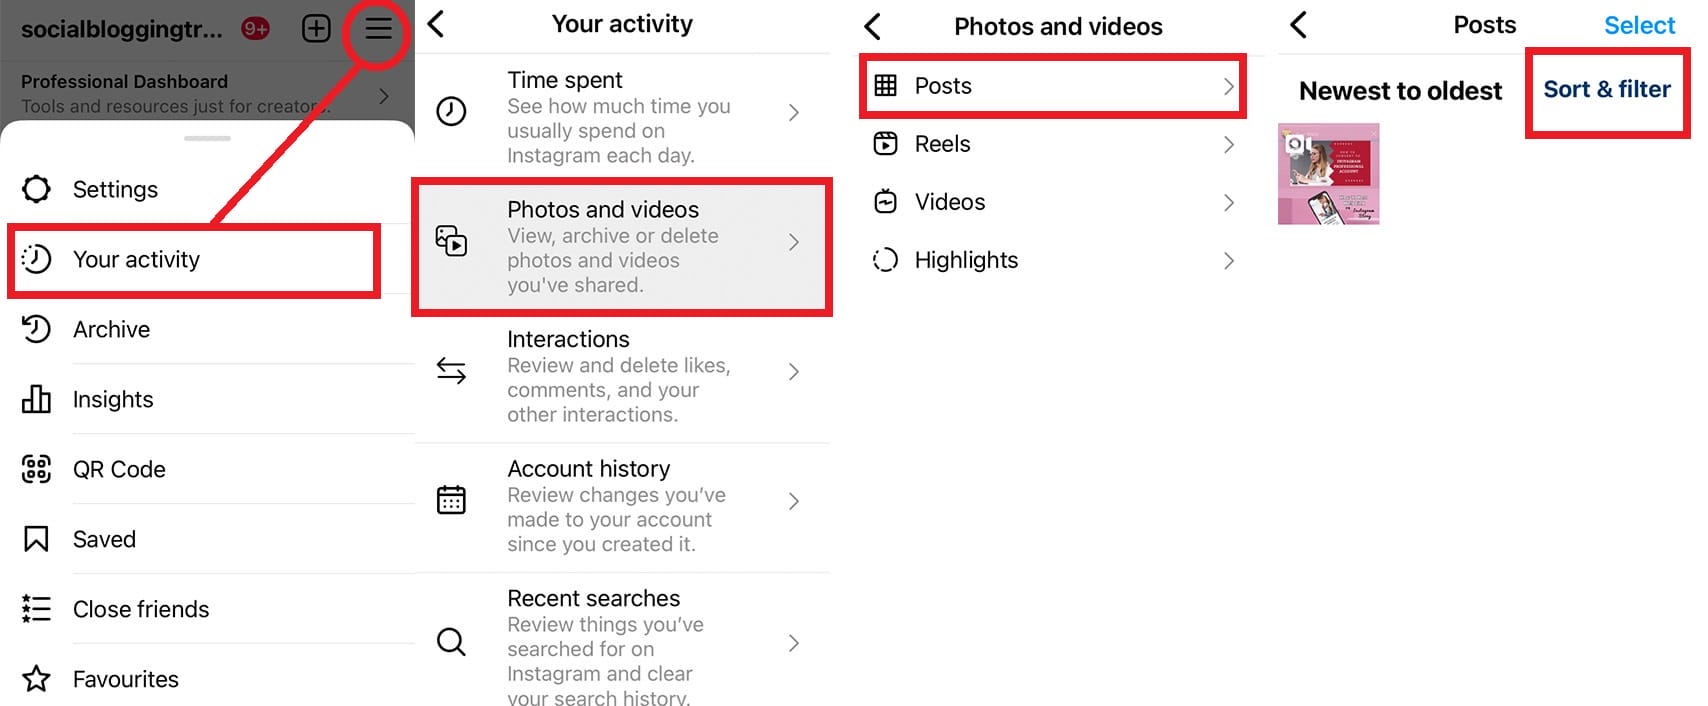
a. How to find an Instagram post/video quickly from your uploads
I used to scroll endlessly for a particular Instagram post I posted and found it too time consuming.
Even if I knew roughly around when it was posted, it still took too much time to just retrieve it.
Now there’s a simpler way to find that particular post or video (reels, highlights).
Click that three-line icon at the upper right corner of your Instagram app, then:
- Tap Your Activity > Photos and videos > Posts > Sort & filter
Choose the type of post you’re looking for, then use the time filter to sort all those posts “Sort & filter”: newest to oldest, oldest to newest, or start date/end date, if you can pinpoint roughly when you posted it.
b. How to See Posts/Videos You’ve Liked on Instagram
Remember that one post you tried to find but couldn’t? You may have liked it in the past, so maybe…
And YES, you can now find it here.
Tap the three-line icon at the upper right corner of your Instagram app, then:
- Your Activity > Interactions > Likes > Sort & filter
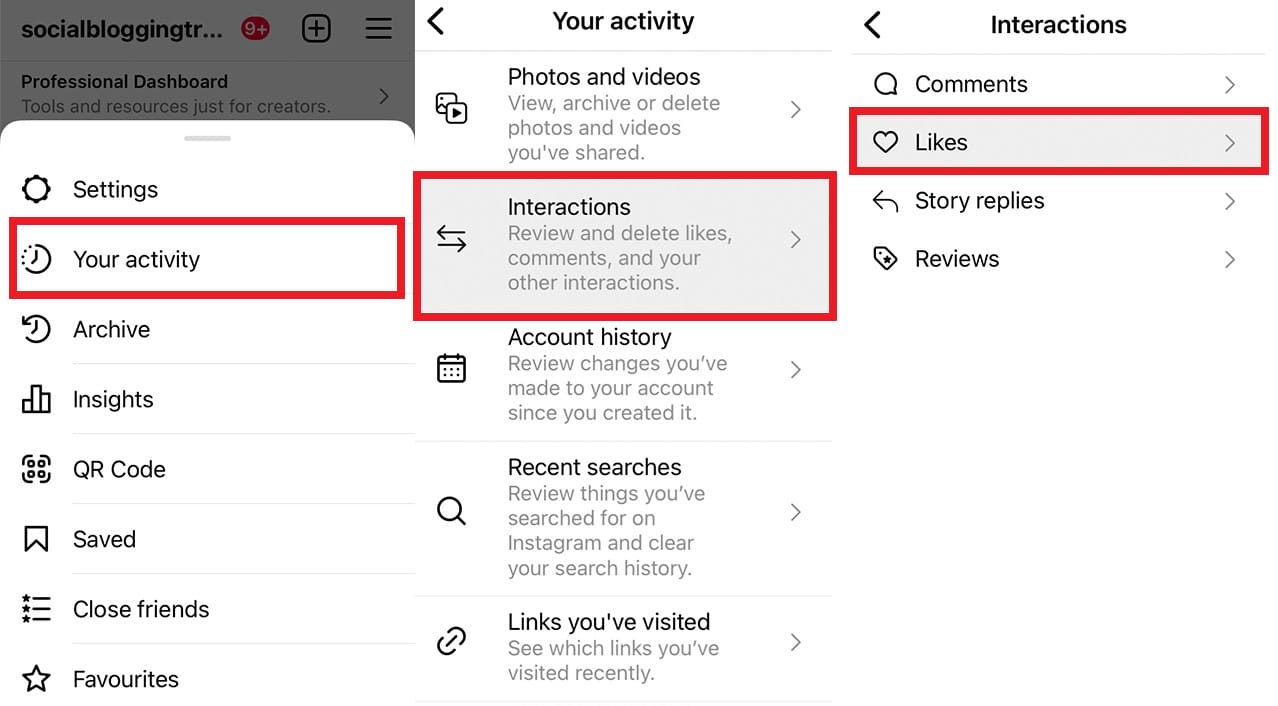
As usual, use the “Sort & filter” to find that particular post. One little difference is that you can “Filter by author” if you know whose account the post belongs to.
You can select several possible accounts and click “Add” next to their account from the search result.
Click “Apply.”
Now the search results are refined and you just might be able to find that post or video you’re looking for.
c. How to Find Instagram Posts You’ve Commented On
Similar to finding the post you’ve liked, you can use the time filter or “Filter by author” to find it.
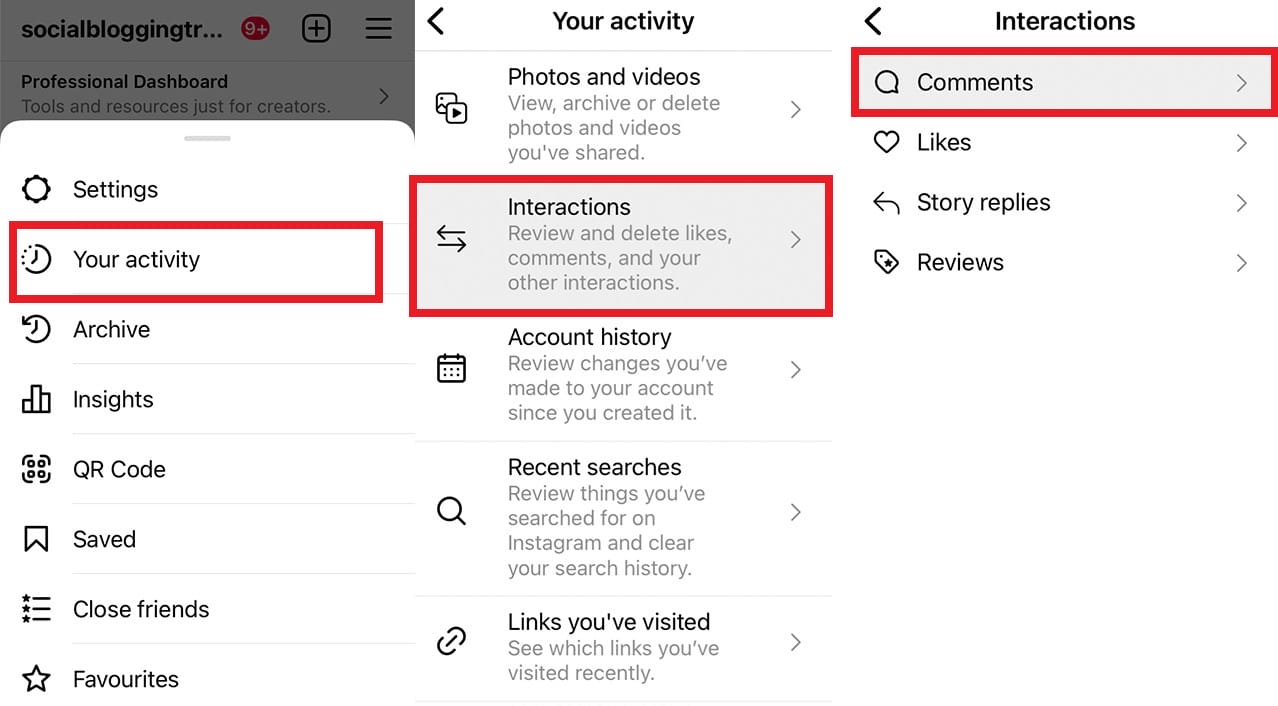
Click that three-line icon at the upper right corner of your Instagram app, then:
- Your Activity > Interactions > Comments > Sort & filter
After selecting the criteria, click Apply.
Sometimes, if you’re not sure who or when, then scrolling seems to be the only way to find it.
Or tweak between newest/oldest, to get closer to what you’re looking for.
And, using the same method, you can also find that particular Story you’ve replied to:
- Your Activities > Interactions > Story replies
d. How to Find Deleted Posts on Instagram
This includes all the posts, stories, IGTV videos and reels you’ve deleted in the past.
Click the three-line icon at the upper right corner of your Instagram app, then:
- Your Activity > Recently Deleted
e. How to Clear Your Instagram Search History
Click the three-line icon at the upper right corner of your Instagram app, then:
- Tap Your Activity > Recent Searches > Clear All
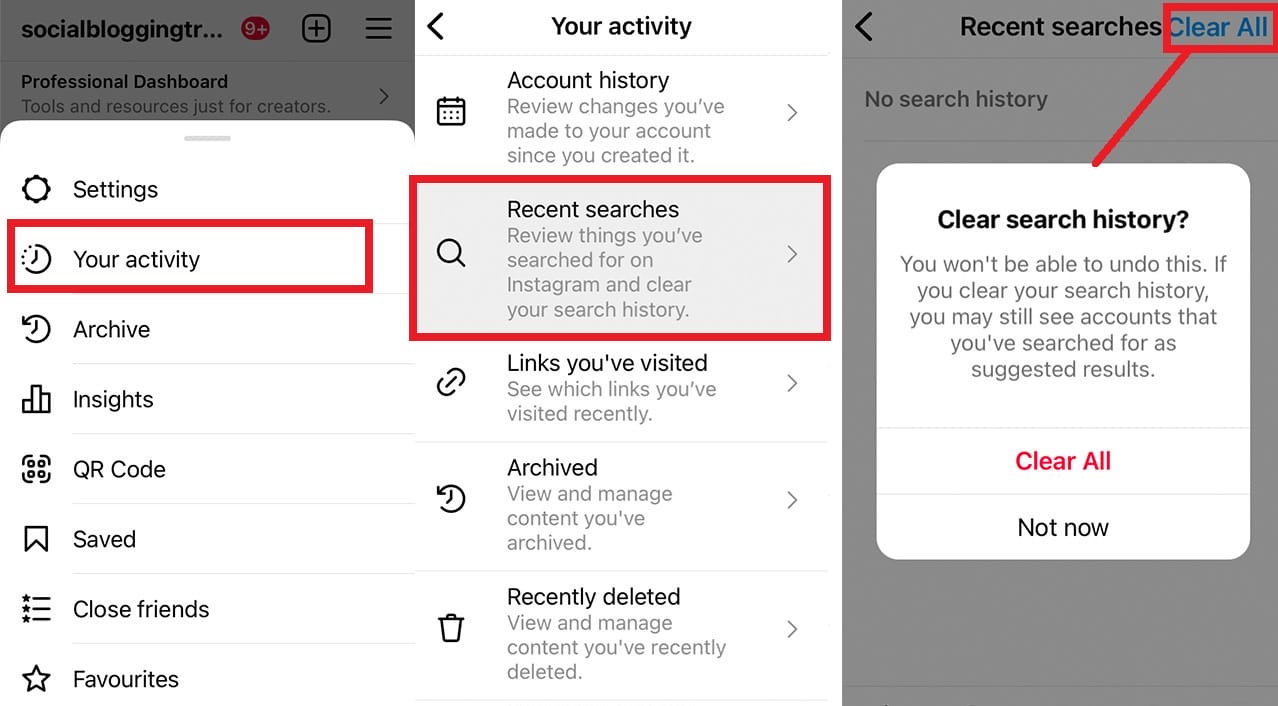
Normally, I would just go to this link and clear my search history if I’m on PC:
https://www.instagram.com/accounts/access_tool/search_history
f. How to Download a Copy of Your Instagram Data
You can actually access your Instagram information containing everything you’ve shared with Instagram.
- Go to Your Activity > Download your information > type in your email address, Request Download
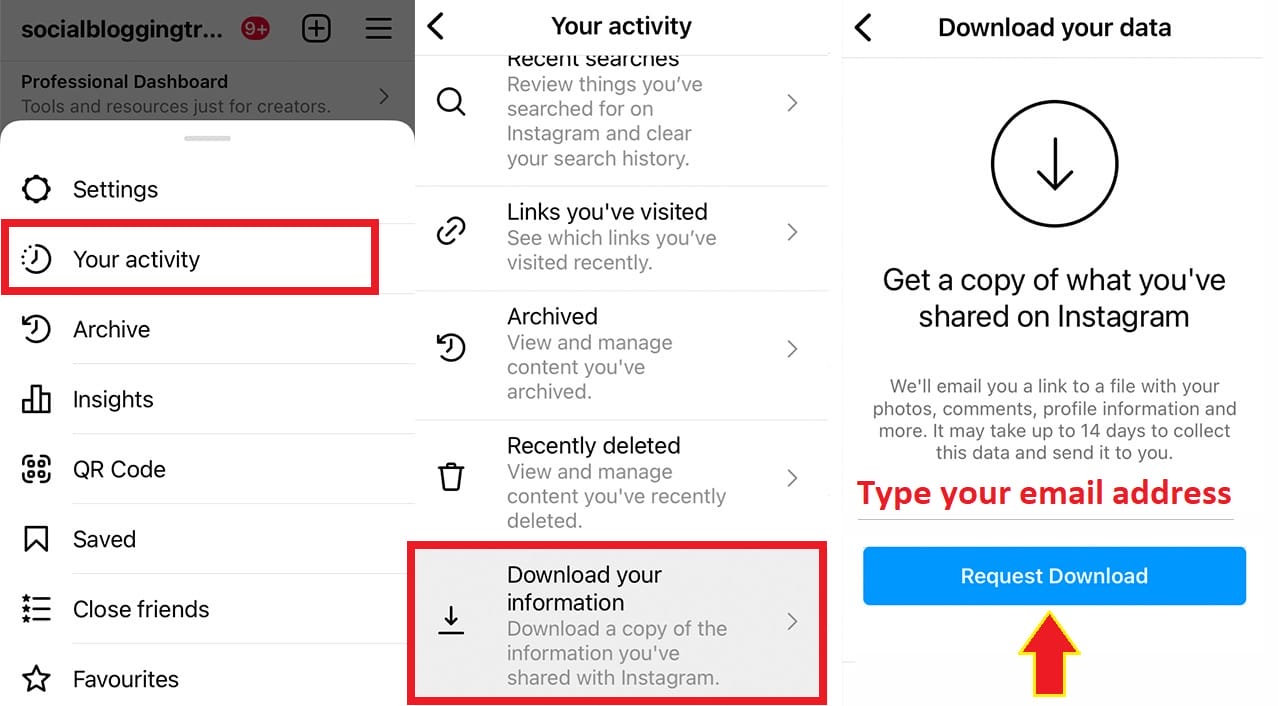
Then, go to your email inbox and wait for the notification email to arrive.
Follow the instructions from the email to start downloading your Instagram information.
#14 How to Pin Your Posts to the Top of Instagram Page (Make Them “Sticky”)
This is one of the newest features and it’s so easy to implement!
It’s a way to highlight your past posts or videos and bring them back to people’s radars when they land on your Instagram Profile page.
I find this a good way for businesses to be a story teller, an intro for new followers, or a reminder about their on-going promotion. Or, to simply highlight a milestone, a fond memory or testimony.
- Go to the post you’d like to pin, click at the three-dot icon > Pin to Your Profile
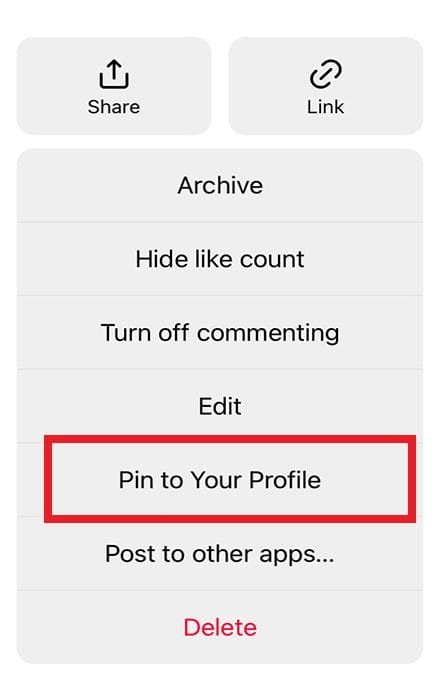
You can pin up to 3 posts on top of your Profile, and you can unpin them anytime.
Once pinned, the post will be moved to the top of your Instagram profile.
When the post is unpinned, it will go back to its original spot in your profile grid:
- Click at the three-dot icon > Unpin from Profile
#15 How to Filter Notification to See What Really Matters (Find Comments, Tags, Mentions FAST)
Go to your Activity option, or the heart icon in the upper right corner of your Instagram app.
Then in “Activity”, use the “Filter” option to view all these categories: tags/mentions, comments or follows.
Or, you can view notifications based on Account Types: “Verified” or “People you follow.”
Don’t forget to click “Apply” once you’re satisfied with the criteria you picked.
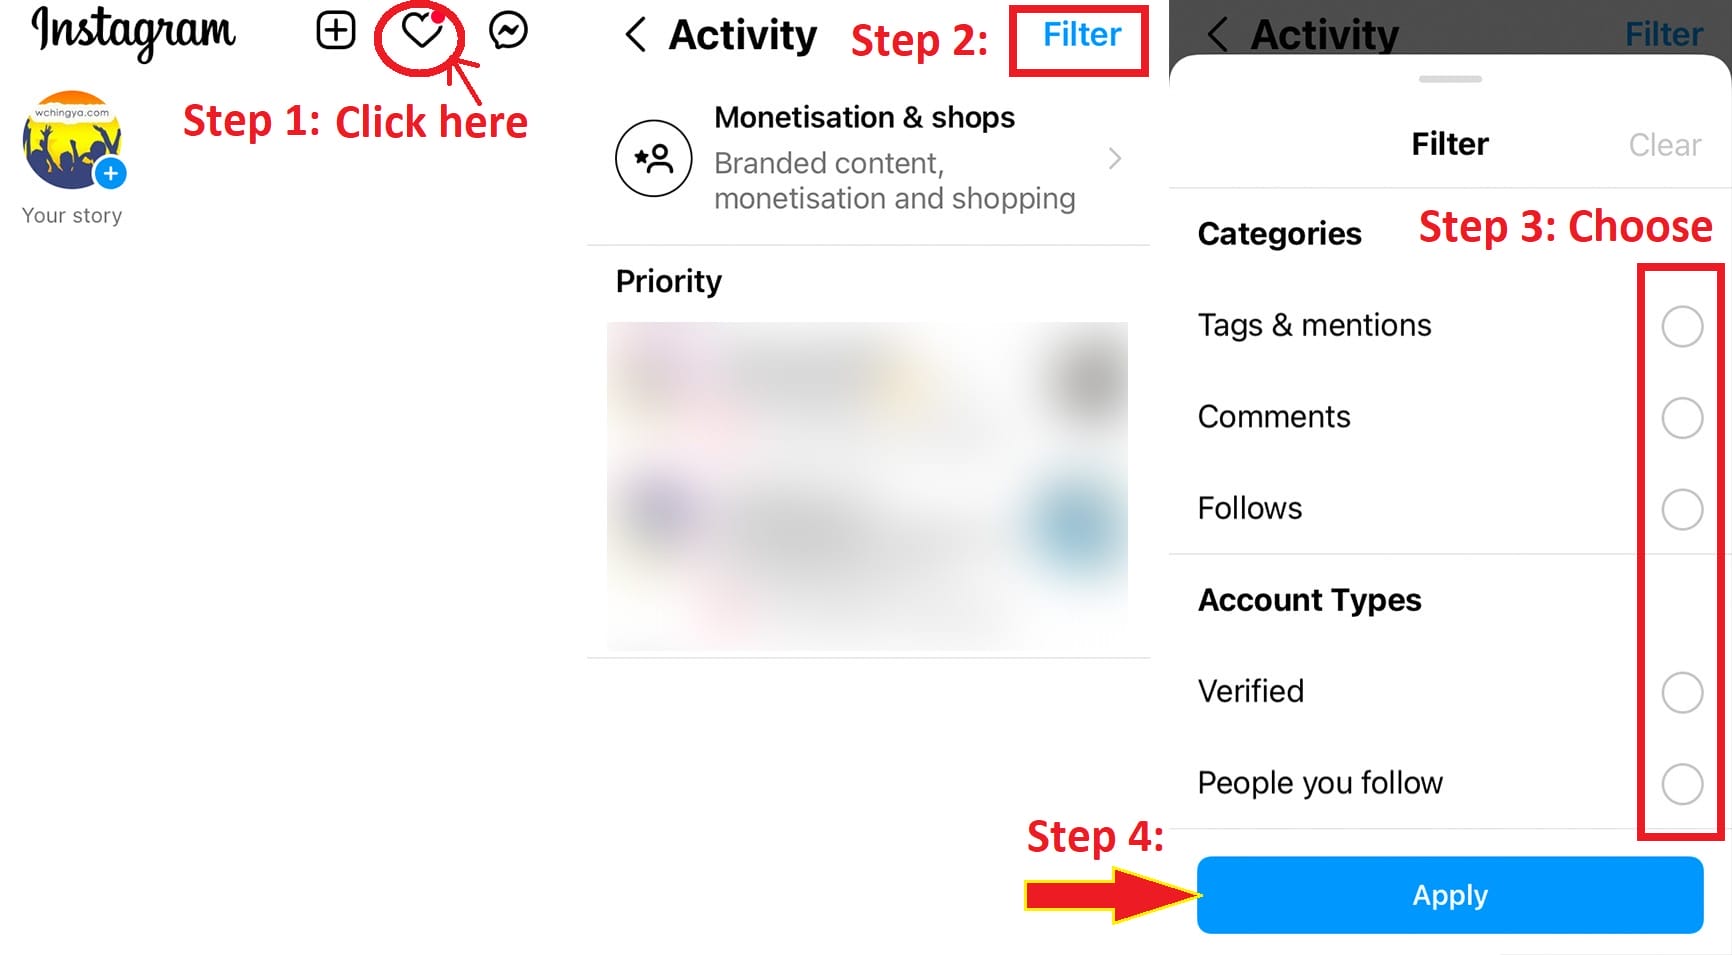
The results will show from your last 1,000 notifications. A good way to narrow down the notifications that truly matter to you.
For instance, I use the “Comments” filter to reply to my commenters. This is one of my personal favourite features—not only does it save time, but it’s very effective in keeping track of the most recent interactions.
#16 How to Preserve Picture Quality When Posting to Instagram
You know the time when you’re posting a picture, only to be disappointed at how bad quality it is!
While you have already made sure your images are in high resolution, Instagram will compress the pictures you upload for the benefit of its platform, freeing up more space.
So, there are a few things you need to bear in mind to minimize the chance of your pictures being compressed:
I. Make sure your pictures are within the correct aspect ratio
As long as your pictures are within these aspect ratio/pixels, they should be fine:
- square (1:1) – 1080×1080 px,
- horizontal (16:9) – 1080 x 607px
- vertical (4:5) – 1080 x 1350px
Personally, I prefer to keep my pictures in square format, but there’s no right or wrong when it comes to choosing which size to use, depends on your preference.
II. Make sure your pictures are in JPEG format
So, you already know that videos should be in MP4 format.
As for pictures, they should be in JPEG format on Instagram, or you may risk your pictures being compressed again during uploading.
Therefore, if you’re specific about the quality of your pictures, be sure to compress your high-resolution pictures before uploading them to Instagram.
Personally, I prefer to use Photoshop to compress all my high-quality pictures since I can choose the proper resolutions and export the pictures for web version, preserving as much detail as possible.
#17 How to Set Up an Instagram Avatar instead of a Real Profile Picture
The reason I’m bringing this up is NOT because I’m a fan of the Instagram avatar.
Personally, I prefer real pictures or a logo for business, but the frequency I’m seeing avatars popping up across the Instagram platform just got me thinking…
Preference aside, if you’re wondering how to get one for yourself, here’s where you’ll find it:
- Go to Settings > Account > Avatar > Get Started
Then, follow the instructions given.
You can configure a personalized avatar with unique facial features, hair, outfits and more. We’ve seen something similar on Facebook (a.k.a. Meta), and if you’re a fan of this new feature, feel free to check it out.
![]()
Since we’re talking about Instagram tips, hacks and features, here are some other Instagram How-To’s that have already been covered on this site. Click on the post title to visit the respective post:
#18 How To Organize And Control Instagram Feed For Accounts You Follow
#19 How To Post To Instagram From PC
#20 How To Schedule Post & Video To Instagram From PC
#21 How To Post Link On Instagram Story [With Link Sticker]
#22 How To Switch To Instagram Business Account From Your Personal Account
#23 How to Remove Audio from Videos Before Posting to Instagram
What you’re seeing is just the tip of an iceberg. I’ll keep adding more tips to this post as I encounter more mention-worthy features, but until then, I hope you enjoy this post and have already learned something new and are ready to rock your Instagram page!
If you have any Instagram tips to share, feel free to let me know in the comments.
MORE FACEBOOK TIPS:
- How to Change Page Name, Username and Facebook Access (and MORE) in New Page Experience
- How To Comment As Your Facebook Business Page On Other Facebook Pages
- How To Add Official Facebook Page To Your Personal Profile
- How To Separate Your Facebook Page From Personal Profile
- 15 Practical Ways To Protect Your Facebook Profile From Facebook Page
- How To Find Your Pending Friend Requests (And Sent Requests) On Facebook
- How To Connect A Facebook Group To Your Facebook Page
